Container Security - In-Depth Book Review
My in-depth review of Liz Rice’s Container Security book
- Introduction
- Chapters
- Chapter 1: Container Security Threats
- Chapter 2: Linux System Calls, Permissions and Capabilities
- Chapter 3: Control Groups
- Chapter 4: Container Isolation
- Chapter 5: Virtual Machines
- Chapter 6: Container Images
- Chapter 7: Software Vulnerabilities in Images
- Chapter 8: Strengthening Container Isolation
- Chapter 9: Breaking Container Isolation
- Chapter 10: Container Network Security
- Chapter 11: Securely Connecting Components with TLS
- Chapter 12: Passing Secrets to Containers
- Chapter 13: Container Runtime Protection
- Chapter 14: Containers and the OWASP Top 10
- Conclusion
Introduction
With the widespread adoption of containers to run production workloads, container security has become increasingly important. Container security is also one of my areas of interest. Unfortunately, while there are numerous articles written on the topic, there aren’t many books written on it. The most popular book written on container security is Liz Rice’s book Container Security: Fundamental Technology Concepts that Protect Containerized Applications. Liz Rice is well known in the cloud native security space and I’d recommend checking out both her books and talks covering container security, eBPF, Cilium and more. Not only does she write and present eloquently, but all her books and talks often include practical demos which help bring the topic to life. As her Container Security book was released back in April 2020 and as of the publication of this post, no 2nd edition has been released, I decided to write an in-depth review and share some of my comments to:
- help readers who are currently reading it to get more out of the book
- fix some of the examples in the book
- to suggest improvements to the book in case a 2nd edition is released
If you are interested in container security, I’d recommend:
- buying a copy of the book
- reading this book review as you read the book. I split my feedback on a chapter by chapter basis to make it easy to read the two concurrently
Other useful resources that I’d recommend readers consult include:
- NIST Special Publication 800-190: Application Container Security Guide
- NOTE this was written in 2017 and, unfortunately, has not been updated. In typical NIST fashion, the publication is both useful and a little on the dry side
- due to it being written in 2017, it does not touch on some of the newer namespaces such as user namespaces, base images such as distroless, etc.
- NISTIR 8176: Security Assurance Requirements for Linux Application Container Deployments
- this builds on NIST SP 800-190 and takes the security solutions recommended in NIST 800-190 and provides detailed metrics to satisfy them and provide you with security assurance
- the articles and blog posts I mention in my feedback for each chapter
There are some topics that, unfortunately, were’t included in the book but which i feel should have been. For example, the key topic of Container Forensics was not covered. In fact, the word forensics / forensic was mentioned only twice in the book. Given the ephemeral nature of containers, I was a little surprised that the book made no mention of performing forensic investigations on containers and the challenges involved. I was expecting to see a chapter on the topic.
At the time the book was published (2020), you had limited options in this area such as:
- Volatility
- this is used for memory forensics for the entire operating system, not specific containers
- the output of tools such as
docker diffand the equivalent for other container runtimes (also have a look atdocker commit) - sysdig traces
- etc
Readers may wish to look into the above for more on the topic. Fortunately, the landscape has improved on this front and you now have CRIU support in Kubernetes (and container runtimes). This lets you take a snapshot of a running container (there are additional tools such as checkpointctl and others that you can then use to inspect the snapshot and perform forensics) and is substantially better than previous options (in most regards). For more on the topic, refer to the following articles:
- Forensic container checkpointing in Kubernetes
- Forensic container analysis in Kubernetes
- Checkpoint API
Another area that I feel was not adequately addressed is that there was very little coverage of real-work container-related breakouts / vulnerabilities. An in-depth look into some of these and how the various isolation mechanisms were bypassed and if specific configurations could have prevented the vulnerability would have added value to the reader. Examples might have included:
- more on Dirty COW (CVE-2016-5195)
- I’d recommend the following for better understanding these attacks: How Bad Is Dirty COW? and Lecture on the Dirty COW Vulnerability and Attack
- runC breakouts such as CVE-2016-9962 and CVE-2019-5736
- Docker vulnerabilites in the
docker cpcommand such as CVE-2018-15664 and CVE-2019-14271 - processes with the
CAP_NET_RAWcapability escalating torooton the host as was the case in CVE-2020-14386
For users interested in these, you can simulate some of these using the recently released dockout framework.
Finally, while the start of the book included a lot of hands-on examples, this decreased substantially after Chapter 4 (with the exception of short examples in Chapter 8 and 9). More hands-on examples would definitely be an improvement.
Chapters
Chapter 1: Container Security Threats
NOTE The first chapter of the book is available for free over here.
The book starts off with a high level look at Container Security Threats and the importance of a “thinking about risks in a systematic way”. The author mentions: “One way to map them is to think of the potential attack vectors at each stage of a container’s life cycle”, advocating for an attacker centric approach covering:
- external attackers
- internal attackers
- malicious internal actors
- inadvertent internal actors
- application processes
and asking various questions about what each of these attackers can do given specific permissions (you can find these over here). However, an attacker-centric approach, is in my opinion, difficult for most IT practitioners to wrap their heads around, as most readers won’t be familiar with this mindset.
A better approach in my opinion is the data-centric threat modeling approach used by NIST SP 800-190 where they look at core components of container technologies (images, registries, orchestrators, containers, and host OSs) and the major risks that can impact each of them and the corresponding mitigations. For example, for image risks, the standard touches on:
- image vulnerabilities
- image configuration defects
- embedded malware
- embedded clear text secrets
- use of untrusted images
I believe that this approach to breaking systems down to individual components and looking at the common risks to each component comes more naturally to the majority of IT professionals. For more on this, I’d recommend that readers read the NIST SP 800-190 standard.
Chapter 2: Linux System Calls, Permissions and Capabilities
In this chapter, the author covers some of the fundamental Linux mechanisms needed to understand containers (and needed in later chapters). This includes covering the following:
- syscalls (system calls)
- file permissions
- Linux capabilities
and a quick look at what “privilege escalation” is
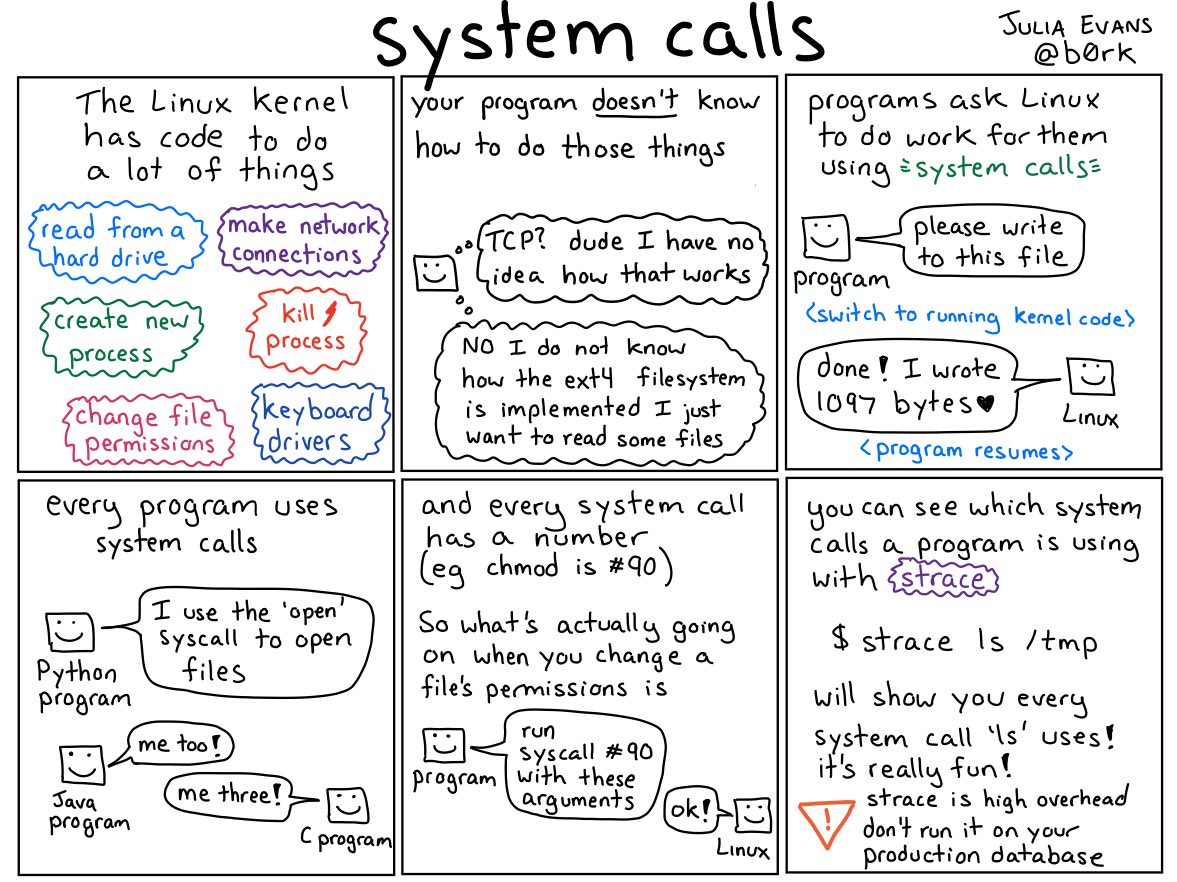
When discussing Linux syscalls (and anything Linux and DevOps-related), I’d highly recommend having a look at some of the diagrams made by Julia Evans related to this (and other topics). For example, this (taken from here) nicely sums up what system calls are:
When touching on setuid as a security risk, it would have been preferable to mention that setuid is only relevant as a security risk in a container environment if the process is not running as the root user within the container. As a point of interest, filtering out the setuid syscall from a Docker container doesn’t give you the protection that you expect as illustrated nicely in this article.
If you’re following along and scratching your head on why the ping example in the Linux Capabilities section no longer works and why ping still works even if you remove the CAP_NET_RAW capability, this is due to a change covered here where ping no longer requires any additional Linux capabilities to work. This article nicely covers the history of the ping command and how it started off as a setuid binary and then progressed to using Linux capabilities and now no longer requires any special capability or permission.
Finally, while the author mentions that you should give the minimum Linux capabilities needed to a process, it would have been preferable if the author covered some of the privilege escalation attacks and abuse that can be performed even with seemingly less powerful capabilities as highlighted here. Coupled with a kernel vulnerability, these can sometimes even escalate to a breakout as was the case in CVE-2020-14386 where you could use the CAP_NET_RAW capability to become root on the host.
Chapter 3: Control Groups
This chapter covers Cgroups (Control Groups) and how they can be used to limit the resources available to different Linux processes. Cgroups are a key component of containers to ensure that containers can’t use unlimited system resources.
While the focus of the chapter is on using cgroups to limit the use of memory and CPU utilization, cgroups also allow you to limit additional resources including:
- CPU set (which CPUs processes can run on)
- network I/O
- disk I/O
- pid (how many processes can be run in a given control group)
- this helps prevent fork bombs in a container from bringing down your host. For a demo of this, refer to this
Some of the areas where I think this chapter could have been improved include:
- how runC was introduced
- the move to cgroups v2 as the chapter covers cgroups v1 which are rarely used
In regards to runC, the author:
- mentions runC without introducing it first and how it fits into the bigger picture
- the examples in the chapter do not work out of the box
runC (run Container) is at the core of higher-level container tools such as Docker, Podman, Containerd, etc. While these other tools are reponsible for managing the lifecycle of a container, runC is a container runtime responsible solely for spawning and running containers that comply with the OCI spec and is responsible for preparing the environment where the container will run (creating namespaces, etc).
This useful diagram (taken from here) summarizes things nicely in the case we are using Docker:

For more details on how runc fits into the picture, I’d recommend reading this article.
To fix the incomplete example in this chapter, we have to understand that runc:
- requires a
config.json - requires a rootfs (a root filesystem that will be used by our container)
The below example does both of these:
mkdir -p runc/rootfs && cd runc

# download runc
wget https://github.com/opencontainers/runc/releases/download/v1.3.0/runc.amd64
chmod +x ./runc.amd64

# download our rootfs
wget http://dl-cdn.alpinelinux.org/alpine/v3.22/releases/x86_64/alpine-minirootfs-3.22.0-x86_64.tar.gz
tar zxf alpine-minirootfs-3.22.0-x86_64.tar.gz -C rootfs

# create our specification file (config.json)
./runc.amd64 spec

# run our container
sudo ./runc.amd64 run mysh
and we should now be in our container:
/ #
/ # df
Filesystem           1K-blocks      Used Available Use% Mounted on
tmpfs                 14229876   3729664  10500212  26% /
tmpfs                    65536         0     65536   0% /dev
shm                      65536         0     65536   0% /dev/shm
tmpfs                 14229876         0  14229876   0% /proc/acpi
tmpfs                 14229876         0  14229876   0% /proc/asound
tmpfs                    65536         0     65536   0% /proc/kcore
tmpfs                    65536         0     65536   0% /proc/keys
tmpfs                    65536         0     65536   0% /proc/latency_stats
tmpfs                    65536         0     65536   0% /proc/timer_list
tmpfs                 14229876         0  14229876   0% /sys/firmware
tmpfs                 14229876         0  14229876   0% /proc/scsi

/ # ps -ef
PID   USER     TIME  COMMAND
    1 root      0:00 sh
    8 root      0:00 ps -ef
As for the chapter’s coverage of cgroups, the chapter covers cgroups v1 while almost all distributions now use v2 (the author did mention cgroup v2 very briefly at the end of the chapter). If we run the sample code in the chapter, we don’t get the expected output. For systems that use cgroups v1, we might see something like this:
$ sudo ./runc.amd64 run mysh

/ # cat /proc/$$/cgroup
12:hugetlb:/mysh
11:pids:/user.slice/user-1000.slice/session-4.scope/mysh
10:freezer:/mysh
9:blkio:/user.slice/mysh
8:perf_event:/mysh
7:rdma:/mysh
6:cpuset:/mysh
5:memory:/user.slice/user-1000.slice/session-4.scope/mysh
4:devices:/user.slice/mysh
3:cpu,cpuacct:/mysh
2:net_cls,net_prio:/mysh
1:name=systemd:/user.slice/user-1000.slice/session-4.scope/mysh
while we see the following on systems that use cgroup v2:
/ # cat /proc/$$/cgroup
0::/
One way to get this to run ps -o cgroup on the process from the host:
$ ps -o cgroup 3589950
CGROUP
0::/system.slice/docker-db9a88c2cf138fc1d9c874d37f53f2ee13864c3a9352f4c9f576e3c56bc6d917.scope
As we can see, a process’s cgroups are under a single hierarchy.
For additional examples of using cgroup v1, I’d recommend this screencast which includes examples of of throttling memory + disk I/O.
For more on cgroups v2, I’d recommend this article.
Chapter 4: Container Isolation
This is easily my favorite chapter in the book and touches on the mechanisms for container isolation including:
- using a dedicated root filesystem
- using namespaces
- using cgroups (covered in a previous chapter).
I particularly enjoyed the hands-on nature of this chapter, including using unshare to experiment with the various namespaces.
While the book mentions that the time namespace is in the works, it is now generally available. While there aren’t many use cases where you would typically use this, there is software such as CRIU (used for checkpointing and restoring running processes) that would benefit from this (refer to this for details).
Although the author does touch on how to give your process its own root filesystem via chroot (and also mentions pivot_root as well), I think an additional section on the dangers of using chroot and how it has been responsible for a number of container escapes would have been useful. For more on chroot escapes, I’d recommend looking at the chw00t tool and trying to understand the various techniques used to escape the chroot environment.
While the author mentions that Kubernetes currently does not support User Namespaces, this has changed from the time of writing and it was added as a beta feature in v1.25 (2022) - refer to this for details. In fact, as of v1.33, user namespaces are now enabled by default as mentioned here so you no longer need to enable any feature flags to use them. A simple example of running a pod that uses user namespaces is as follows (all we had to do was to add the hostUsers: false line):
apiVersion: v1
kind: Pod
metadata:
  name: userns
spec:
  hostUsers: false
  containers:
  - name: shell
    command: ["sleep", "infinity"]
    image: debian
If we run the above (it requires us to use either Kubernetes 1.33 or to enable the feature flag - UserNamespacesSupport - refer to this for more on feature flags), we can verify that it uses user namespaces by execing into the container and then:
/ # cat /proc/self/uid_map
         0 2174943232      65536
If we ran the same manifest without the hostUsers: false line, we would get the following instead:
/ # cat /proc/self/uid_map
         0          0 4294967295
Chapter 5: Virtual Machines
This chapter covers:
- the basics of virtual machines and the various types
- a comparison of the security boundaries of VMs vs containers
The author offers a solid introduction to how virtualization works. Of interest and something that many users of Windows may not realize is that Hyper-V is a Type 1 hypervisor, which means that Hyper-V runs before Windows runs and Windows runs on top of Hyper-V. This can lead to some unexpected performance degradation in specific workloads such as real-time audio and other tasks as mentioned in this thread.
Chapter 6: Container Images
This chapter covers the lifecyle of container images including:
- the OCI standards
- the various options you have for building images
- storing images
- deploying images
While building images using a Dockerfile still defaults to requiring root privileges for the user (either directory of by adding them to the docker group which effectively gives them root on the host), there are currently workarounds to this that don’t require root privileges including:
- combining rootlesskit & buildkitd (refer also to this)
- running your build in a microvm as mentioned here
When touching on the “Provenance of the Dockerfile”, the author mentions that bad actors able to modify a Dockerfile can use it to:
- add malware or crypto-mining software into the image
- access build secrets
- enumerate the network topology accessible from the build infrastructure
- attack the build host
However, the last 3 of these are not typically applicable unless the user has the right to run a docker run in the build environment.
While covering “Dockerfile Best Practices for Security” section and how to minimize the possibility of the host building the Docker image from being compromised, no mention was made of tools to help automate some of these checks such as:
and others.
While distroless was mentioned as a way to minimize your attack surface, no mention was made of other tools such as slim / dockerslim which minimize the attack surface even more.
When discussing the RUN command in Dockerfile, the author states: “Let’s be absolutely clear - a Dockerfile RUN command lets you run any arbitrary command. If an attacker can compromise the Dockerfile with the default security settings, that attacker can run any code of their choosing”. While this is true, I think it would have been preferable to highlight that this allows the user to run any code within the container and not on the host (unless they also have docker run privileges on the host in which case they are already root on the box).
When discussing “Signing Images”, Sigstore Cosign is an increasingly popular option worth investigating.
Finally, while the chapter was largely theoretical, it would have been nice to add a simple scenario showing the backdooring of a Docker container (while maintaining its functionality). While you can do this manually, there are tools such as dockerscan that help to automate this.
Chapter 7: Software Vulnerabilities in Images
The author mentions that compiled languges like Go, C and Rust can have shared libraries linked inside the binary and you can therefore not scan them for pubblished package vulnerabilities. However, this is not always the case. For example, Trivy can scan binaries built in Go.
In the “Prevent Vulnerable Images from Running” section, the author mentions using OPA as a admission controller to prevent that images have passed their vulnerability scans before deploying them in your Kubernetes cluster. Personally, I would recommend using Kyverno instead in Kubernetes environments. For more on the actual policy, have a look at this.
Chapter 8: Strengthening Container Isolation
This chapter covers one of my favorite topics, container isolation / sandboxing, and looks at using the following options to better isolate your containers:
- seccomp
- AppArmor
- SELinux
- gVisor
- lightweight VMs including Firecracker and Kata Containers
While discussing the available options, the author also mentions their limitations and what types of vulnerabilities they can or can’t protect against. For example, she mentions that the following sandboxing techniques such as:
- seccomp
- AppArmor
- SELinux
you could still be bypassed by vulnerabilities such as Dirty COW.
An important point mentioned by the author is that although Docker applies a seccomp profile by default, Kubernetes doesn’t. Many Kubernetes admins do not realize this, lowering their container’s security posture. To enable seccomp to all containers in your Kubernetes cluster, you have a number of options including:
- using Pod Security Standards (this has replaced PodSecurityPolicies which is mentioned in the book and which is no longer supported)
- using the
SeccompDefaultfeature gate mentioned here - using an admission controller such as Kyverno
When covering gVisor, the example in the book was useful but incomplete. A complete example is shown below:
mkdir -p example/rootfs && cd example

# download runsc
ARCH=$(uname -m)
URL=https://storage.googleapis.com/gvisor/releases/release/latest/${ARCH}
wget ${URL}/runsc ${URL}/runsc.sha512
sha512sum -c runsc.sha512
rm -f *.sha512
chmod a+rx runsc

# download rootfs
wget http://dl-cdn.alpinelinux.org/alpine/v3.22/releases/x86_64/alpine-minirootfs-3.22.0-x86_64.tar.gz
tar zxf alpine-minirootfs-3.22.0-x86_64.tar.gz -C rootfs

# create our specification file (config.json)
./runsc spec
sudo ./runsc run sh
and then in another shell:
$ sudo ./runsc list
ID          PID         STATUS      BUNDLE                  CREATED                          OWNER
sh          17481       running     /home/vagrant/example   2025-06-05T01:07:09.611626914Z   root
If we then run a:
sleep 1000
command within the container, we can see it from another terminal by:
$ sudo ./runsc ps sh
UID       PID       PPID      C         TTY       STIME     TIME      CMD
0         1         0         0         ?         01:07     0s        sh
0         2         1         0         ?         01:07     0s        sleep
but we won’t see it on the host system. We’ll end up seeing something like this instead:
$ ps fax
    PID TTY      STAT   TIME COMMAND
  ...
  17468 pts/1    S+     0:00  | \_ sudo ./runsc run sh
  17470 pts/2    Ss     0:00  |     \_ sudo ./runsc run sh
  17471 pts/2    Sl+    0:00  |         \_ ./runsc run sh
  17477 ?        Ssl    0:00  |             \_ runsc-gofer --root=/var/run/runsc gofer --bundle=/home/vagrant/example --gofer-mount-confs=lisafs:none --io-fds=6 --mounts-f
  17481 ?        Ssl    0:00  |             \_ runsc-sandbox --root=/var/run/runsc boot --apply-caps=false --attached=true --bundle=/home/vagrant/example --controller-fd=6
  17501 ?        Ss     0:00  |                 \_ [exe]
  17507 ?        S      0:00  |                 \_ [exe]
  17508 ?        SN     0:00  |                 |   \_ [exe]
  17519 ?        S      0:00  |                 \_ [exe]
  17520 ?        SN     0:00  |                 |   \_ [exe]
  17522 ?        S      0:00  |                 \_ [exe]
  17523 ?        SN     0:00  |                     \_ [exe]
so it sees it as [exe]. Finally, we kill the sleep process and then delete the container:
$ sudo ./runsc run sh
sleep 1000
^C
$ sudo ./runsc delete sh
Finally, one key point that is important to understand and which many security practioners don’t fully understand is the difference between AppArmor and SELinux, especially how they apply to containers. AppArmor is namespace-aware while SELinux is not. In terms of general features (for normal processes), SELinux with its labelling approach is more powerful while AppArmor is easier to use. However, for containers, AppArmor is much more flexible and allows you to write per container profiles (because it is namespace-aware). For example, for a sensitive user-facing container, I’d recommend writing a profile and limit what the main process(es) can run within the container, what files it can write (if any) and so on.
Unlike AppArmor which allows you to develop custom-tailored policies per container, SELinux only supports a very basic version of this and doesn’t allow us to limit what a given process within a container can do within that container. SELinux for containers and VMs labels each container or VM with a different SELinux label (it uses the last field of the SELinux context). That means that even if multiple containers or VMs are run by the same user, if one of them is compromised, it can’t easily broaden its attack and read / modify:
- files they are using
- IPC
- ptrace
of another container. Even with the use of a tool such as udica, you can only use it to specify:
- Linux Capabilities
- mount-points and
- ports
of a specific container. This is nowhere near as flexible as what you can do with AppArmor.
Finally, given the advances in eBPF over the past few years (especially with the introduction of LSM eBPF), I think an additional discussion of new options available to security professionals for runtime security would be useful.
Chapter 9: Breaking Container Isolation
This chapter covers various ways in which container isolation can be intentionally reduced including:
- containers running as the
rootuser by default - using the
--privilegedflag - mounting sensitive directories
- etc
Chapter 10: Container Network Security
This chapter covers isolating containers from one another at the network layer unless needed to limit the blast radius of a compromised container attacking other containers and services. It looks as using:
- Network Policies (Kubernetes)
- Service Mesh (Kubernetes)
to isolate workloads. The chapter focuses largely on how to do this in Kubernetes with a short introduction to the OSI networking model and a very brief mention of custom Docker networks.
One area of interest which readers may have and which was not mentioned is how Pods on different hosts communicate. Overlay networks are virtual networks built on top of the physical network infrastructure and enable communication between Pods on different hosts. For more details on Overlay networks and how Docker Swarm uses them (Docker Swarm is no longer a major player in the orchestration scene), I’d recommend this blog post by Nigel Poulton. Although it was written in 2016, it still gives you the key details. For more, I would recommend check out Chapter 11: Docker Networking in Nigel Poulton’s book, Docker Deep Dive.
If you are running Docker and not Kubernetes, the author mentions the use of user-defined Docker networks via the docker network to create isolated networks. However, doing so only isolates workloads, with no firewalling between the containers within a network. If you’re looking for a Docker-specific solution, Docker comes with the ability to limit container connectivity using ICC (Inter Container Connectivity). However, this is very limited and applies only to the default network. Instead, if you want something more flexible, I’d recommend using DFW (Docker Firewall) instead. DFW allows you to:
- create firewalls between Docker containers
- limit what traffic can get to your Docker containers from outside sources, regardless of what ports the Docker container exposes.
Finally, for the Kubernetes section, the author mentions:
- Network Policies
- Service Meshes
with Istio getting the most attention. One point that I feel would have been beneficial is to go into the limitations / issues with each of these. For example, Network Policies, out of the box:
- are not easy to visualize at the cluster level (there are some small projects working on this such as network-config-analyzer) and you can’t easily set policies that individual Network Policies can’t override, which is the reason that they are now working on this feature
- Network Policies, by default, only allow
Allowrules. This is CNI provider specific, with some such as Calico allowing you to defineAllow,Deny,Log,Passrules
Meanwhile, service meshes add:
- complexity
- network overhead (typically around the 20% - 25% range)
- CPU and memory overhead (especially when using a sidecar approach)
One final item to remember is that while Kubernetes uses namespaces to isolate resources, namespaces do not by themselves provide any level of isolation at the network level.
Chapter 11: Securely Connecting Components with TLS
This chapter provides a concise, solid introduction to TLS including:
- X.509 certificates
- TLS connections
- certificate revocation
Chapter 12: Passing Secrets to Containers
This chapter looks at the possible options to pass secrets to containers including:
- embedding it into the container image
- passing the secret over the network
- passing secrets in environment variables
- passing secrets through files
including how to do so in a Kubernetes environment.
One key point mentioned by the author related to passing secrets to your application and which I’d like to emphasize is how the use of environment variables should be avoided as it comes with security concerns including:
- a crash can result in environment variables being dumped and ending up being logged in a log management system or crash reporting and tracking system
- there are various options to view the environment variables passed to a process (via
/proc,docker inspect,kubectl describe pod, etc.)
One of the reasons that environment variables are so widely used is that the use of environment variables is one of the factors of the 12 Factor App manifesto. A more secure alternative is to instead pass secrets through files that are stored in-memory as mentioned by the author.
One point that the author does mention regarding using Kubernetes RBAC to control access to secrets is: “You can set up Kubernetes RBAC (role-based access control) so that users can configure secrets but can’t access them again, giving them write-only permissions”. One additional recommendation is that any user with the list verb permission on a secret can view the secret’s content. So it is not only users with the get verb permission that can do so.
For example, if we had the following:
apiVersion: v1
kind: Secret
metadata:
  name: secret-sa-sample
  annotations:
    kubernetes.io/service-account.name: "sa-name"
type: kubernetes.io/service-account-token
data:
  extra: YmFyCg==
and then use the GET verb, we can see the contents of our secret:
$ kubectl get secrets db-user-pass -o yaml
apiVersion: v1
data:
  password: UyFCXCpkJHpEc2I9
  username: YWRtaW4=
kind: Secret
metadata:
  creationTimestamp: "2025-06-05T04:32:48Z"
  name: db-user-pass
  namespace: default
  resourceVersion: "51246"
  uid: fa16d3ea-0bce-493e-b935-c8b63417b4fd
type: Opaque
However, the LIST verb can also leak secrets:
$ kubectl get secrets
NAME           TYPE     DATA   AGE
db-user-pass   Opaque   2      4h42m
$ kubectl get secrets -o yaml
apiVersion: v1
items:
- apiVersion: v1
  data:
    password: UyFCXCpkJHpEc2I9
    username: YWRtaW4=
  kind: Secret
  metadata:
    creationTimestamp: "2025-06-05T04:32:48Z"
    name: db-user-pass
    namespace: default
    resourceVersion: "51246"
    uid: fa16d3ea-0bce-493e-b935-c8b63417b4fd
  type: Opaque
kind: List
metadata:
  resourceVersion: ""
For a full demo, you can have a look at this article.
Another method of leaking secrets is that if a user can create a pod, he can simply specify the secret in the manifest and gain access to it, even if the user doesn’t have the RBAC permissions to view the secret directly. As mentioned in the official documentation: “Additionally, anyone who is authorized to create a Pod in a namespace can use that access to read any Secret in that namespace; this includes indirect access such as the ability to create a Deployment”.
A solution is to use separate namespaces to isolate access as mentioned here and to limit which users can launch Pods in which namespaces.
Finally, one area that was absent is how practioners can detect secrets in source code and embedded in images. TruffleHog is one such tool (among others) that I would recommend.
Chapter 13: Container Runtime Protection
This chapter touches on container runtime protection. More specifically, it looks at building profiles for your container based on:
- executed processes
- files accessed
- network traffic patterns
- using a non-
rootuser - limiting Linux capabilities used
However, I felt that the chapter was very short and more theoretical than practical and largely overlapped with parts of Chapter 8.
Chapter 14: Containers and the OWASP Top 10
This chapter looks at the OWASP Top 10 (the 2017 edition) and if there are any container-specific protections you can add to protect your application. Some comments I would add are:
- for more comprehensive application security requirements, I’d recommend the OWASP ASVS instead
- for Injection attacks, Kubernetes users who don’t already have a WAF filtering traffic to their containers may look to see if their ingress controller has WAF functionality that can help in this regard. For example, ingress-nginx has this. This can help mitigate some of the other categories as well
- the Citi vulnerability mentioned by the author as an example of an Insecure Deserialization attack is actually an IDOR (Insecure Direct Object Reference) attack
Conclusion
Overall, I’d highly recommend reading the book for anyone interested in container security. Hopefully, if a second edition is released, it will address some of the issues mentioned in this review.