Building a Threat Hunting Lab Using Elastic Stack and Vagrant

Build a dynamic malware analysis virtual lab with logging to the Elastic Stack / Elastic Cloud
Introduction
I recently reviewed Andrew Pease’s book Threat Hunting with Elastic Stack which is probably the best resource on using Elastic Stack / ELK as a SIEM and for threat hunting. However, I mentioned that I would have liked it if the author had provided readers with virtual machines or Vagrant boxes for some of the lab machines (especially the Windows boxes) instead of manually walking users through the process of installing the various components. While learning how to install the necessary components is important, it isn’t something you want to do more than once and pointing users on how to automate the process using Vagrant would have been a nice touch. Vagrant is a tool for building re-usable virtual machines and was primarily developed to help developers build portable virtual software development environments that they can easily share with other developers to ensure that they are all running identical development stacks. It was very popular before Docker took the developer community by storm and largely replaced it.
However, I’d highly recommend every security professional learn to use it to help them quickly build VMs for their labs. For security professionals, knowing both Vagrant and Docker is important as you can’t do everything using just containers. For example, if you ever need a Windows-based virtual machine or need to experiment with lower level technologies on Linux such as eBPF, SELinux, AppArmor, etc., then you’ll need a VM and Vagrant is your best option to bootstrapping and building re-usable VMs.
After reaching out to Andrew, it turns out that he did release a Vagrantfile (used to define a machine in Vagrant) to help you quickly build a dynamic malware analysis virtual machine that logs to Elasticsearch. All that is required is for you to install Vagrant and fill out the variables in the bootstrap script and then run a single command to provision your machine. Vagrant does the heavy lifting and downloads the Windows virtual machine and then bootstraps it by installing some dynamic malware analysis tools and hooking it up to log to Elasticsearch. The virtual machine comes with a number of observability tools to get you started including:
- Sysinternals Suite
- Process Hacker
- NetworkMiner
- Sysmon w/ SOS configuration (SwiftOnSecurity)
- Wireshark
in addition to scripts to enable enhanced logging in addition to the Elastic Agent , Elastic’s unified agent for logging to Elasticsearch. Elastic Agent is the future of the Beats family and aims at replacing all your current Beats (Filebeat, Winlogbeat, Packetbeat, etc.) with a single agent that is centrally managed and which allows you to push out configuration to your endpoint agents without using an orchestration tool such as Ansible, Chef, etc. It also includes Endgame’s EDR/AV agent.
Vagrant will also install some run of the mill software such as Microsoft Office and Adobe Reader as well as OpenVPN (you have to provide your own credentials) which helps you protect your IP from being added to blacklists when detonating malware samples. The VM is configured to sends logs to Elastic Cloud, Elastic’s SaaS offering. Elastic Cloud is a SaaS offering of the Elastic Stack (Elasticsearch, Kibana, and Fleet Server) with a 14-day free trial period (does not require a credit card).
However, while setting things up, I noticed the following two issues:
- if this is your first time to use Elastic Cloud, then the instructions on the GitHub page aren’t clear
- the
Vagrantfileis aimed at users running Virtualbox . I don’t currently use Virtualbox and do all my virtualisation on Linux/KVM which means the current instructions don’t work
In this blog post, we’ll take a look at both of these. If you’re currently using Virtualbox, feel free to skip the KVM-specific section. In a future post, I plan on covering how to send logs to a local Elastic Stack installation and not depend on Elastic Cloud.
Preparing Our Environment
Elastic Cloud
Our first step is to sign up to Elastic Cloud. We can sign up for a 14-day free trial without needing a credit card. Elastic Cloud works by provisioning cloud instances in a cloud vendor of your choice (GCP, AWS, and Azure) and a location of your choice and setting up the Elastic Stack for us. The cloud providers and locations to vary depending on availability (this probably applies solely to the trail tier) and I was only given the option of launching a deployment on GCP in the us-central1 region. Once selected, it may take a few minutes for our deployment to be provisioned. By default, it provides us with a number of instances including:
- a master node
- two data nodes
- a Kibana node
- an integration server
- an Enterprise Search node
When our Elastic Cloud deployment is ready, we then need to extract some settings, some of which will be needed in our Vagrant provisioning script. We need the following from our Elastic Cloud deployment:
- Elastic password
- Kibana URL
- Fleet URL
- Fleet Enrollment Token
The Elastic password is the password we will use to login to the Kibana dashboard. To extract it, we login and then: Select our deployment -> Security -> Reset password. We should see something like this:
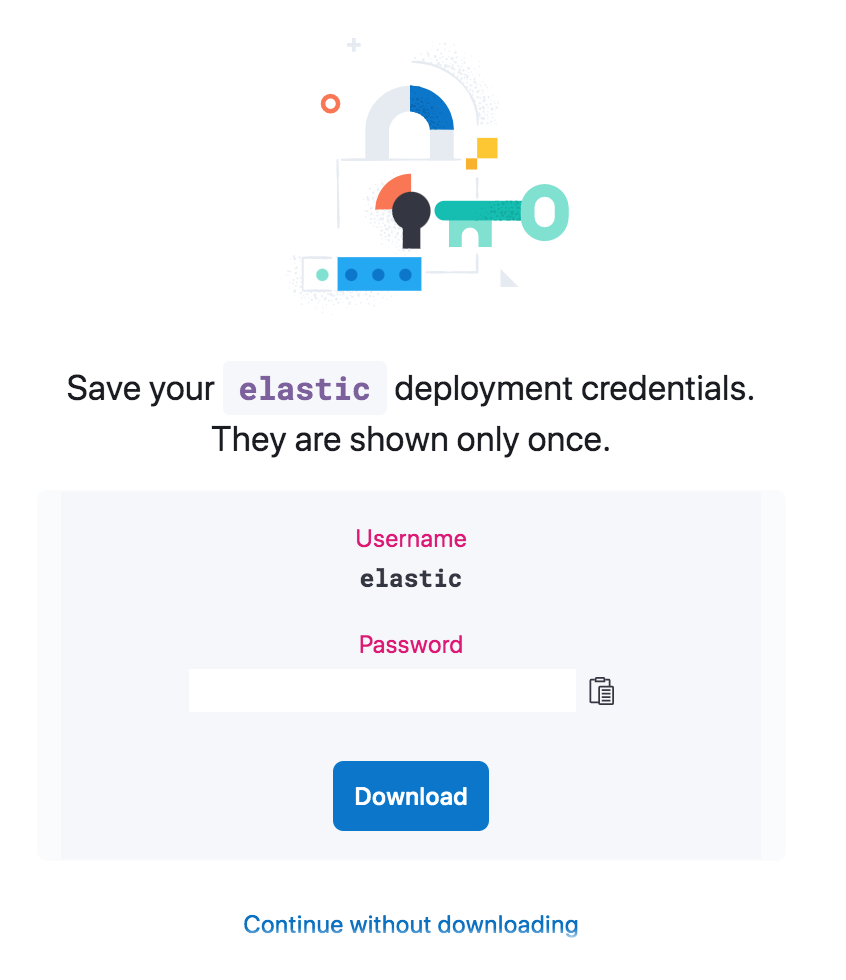
We are given the option to download it in CSV format. Although the password is only shown once, we can reset it if needed at any time.
On our deployment dashboard, we’ll find a link to our Kibana dashboard which we want to grab by clicking on Copy endpoint next to Kibana. Another link we’ll want to grab is the Fleet URL which we will need to configure our Elastic Agent (more on this below). Again, click on Copy endpoint. By clicking on Open next to Fleet URL, we can open the Fleet dashboard which gives us an overview of our agents and allows us to:
- view all our agents and when they were last seen
- define Agent policies (which Beats to run and with what configuration)
- create enrollment tokens (these are API keys used by our Elastic Agents to connect to our Fleet Server. The Fleet Server orchestrates our Fleet Agents and pushes out policy updates, etc.)

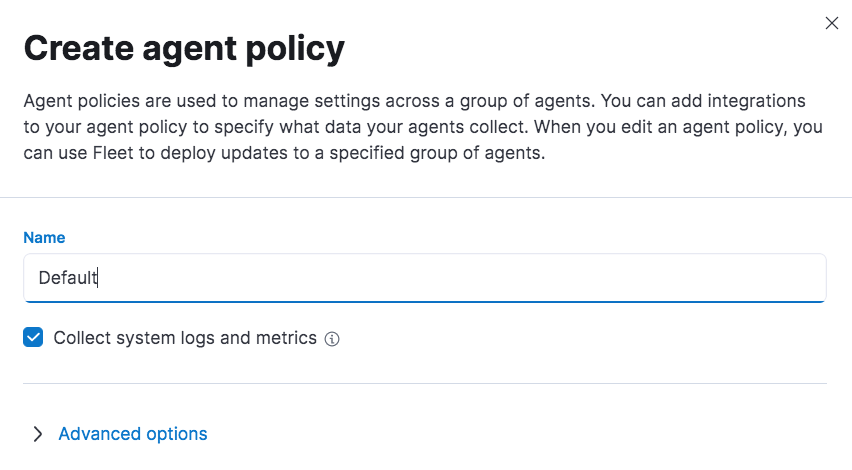
Before creating an enrollment token, we first have to create an Agent policy. Under this tab, we Create agent policy, give it a name and leave the defaults (we can update the policy at any time).
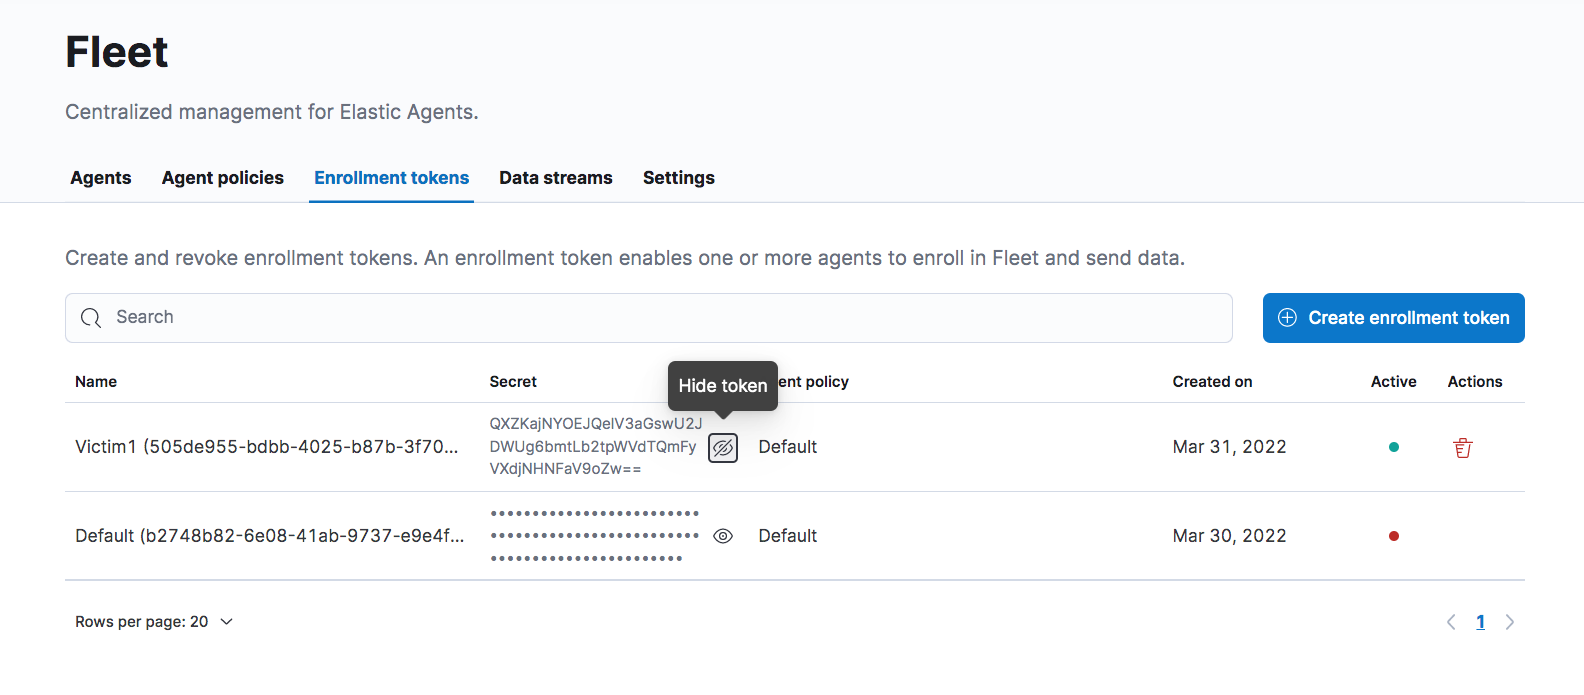
Once created, we can then switch to the Enrollment tokens tab and we’ll find that a default enrollment token has been created. However, we can’t use it and we’ll have to create a new one and use it instead. We click on Create enrollment token and give the token any name while making sure that the policy is set to Default. Once created, we can copy the value of Secret:
We are now ready to configure Vagrant and provision our VM.
Updating Our Configuration
Now that we have the values needed from our Elastic Cloud deployment, we can bootstrap our VM. To do so, we’ll need to do two things:
- update
provision.ps1, which is the provisioning script ourVagrantfiletells Vagrant to use - update
Vagrantfileto support KVM (Virtualbox users can skip this step)
The Windows login credentials for our provisioned box are: vagrant/vagrant.
Updating provision.ps1
We’ll start by cloning the windows-10-sandbox-to-elastic repository which contains the files we need to configure and bootstrap our VM:
$ git clone https://github.com/peasead/windows-10-sandbox-to-elastic
$ cd windows-10-sandbox-to-elastic
$ ls
LICENSE  README.md  Vagrantfile  openvpn-auth.conf  openvpn.ovpn  provision.ps1  vpn-connect.ps1
The repository contains the following files:
| File | Details |
Vagrantfile | This file tells Vagrant which box (pre-packaged VM) to use as a base image as well as other settings such as how much memory to allocate to the VM, any files to copy to our VM, whether to run any provisioning scripts, etc. In our case, we tell it to run the provision.ps1 PowerShell script |
provision.ps1 | Vagrant allows us to specify provisioning scripts that run when our VM is launched. When provisioning Windows boxes, this is typically a PowerShell script. In this repo, provision.ps1 is used to provision our instance. Vagrantfile points to this file to instruct Vagrant to use it |
openvpn-auth.conf | This file is used to store our OpenVPN credentials (if we want to configure and use OpenVPN) |
openvpn.conf | This file is our OpenVPN configuration. We would overwrite this with our own OpenVPN config file if we wanted to use OpenVPN |
vpn-connect.ps1 | This is a simple PowerShell script to start OpenVPN using our configuration files. Keep in mind that even if we do provide our OpenVPN configuration and other details, the OpenVPN service isn’t started automatically for us. We have to manually start it using this script once our VM is up and running |
Looking at provision.ps1, we see the following:
# Define variables
## Elastic Agent / Fleet
Set-Variable -Name "elastic-version" -Value "8.1.1"
Set-Variable -Name "elastic-fleet-url" -Value "your-elastic-fleet-url"
Set-Variable -Name "elastic-fleet-policy-enrollment-token" -Value "your-elastic-fleet-policy-enrollment-token"
$ProgressPreference = 'SilentlyContinue'

## OpenVPN Authentication
Set-Variable -Name "openvpn-username" -Value "your-openvpn-username"
Set-Variable -Name "openvpn-passphrase" -Value "your-openvpn-passphrase"

# Install Chocolatey
choco upgrade all -y
refreshenv

# Elastic Agent
Invoke-WebRequest -Uri https://artifacts.elastic.co/downloads/beats/elastic-agent/elastic-agent-${elastic-version}-windows-x86_64.zip -OutFile "c:\users\vagrant\Desktop\elastic-agent.zip"
Expand-Archive -F c:\users\vagrant\desktop\elastic-agent.zip -DestinationPath c:\users\vagrant\desktop\elastic-agent
& c:\users\vagrant\Desktop\elastic-agent\elastic-agent-${elastic-version}-windows-x86_64\elastic-agent.exe install -f --url=${elastic-fleet-url} --enrollment-token=${elastic-fleet-policy-enrollment-token}

# OpenVPN
choco install openvpn -y
(Get-Content "c:\users\vagrant\desktop\openvpn-auth.conf").replace('openvpn-username', ${openvpn-username}) | Set-Content "c:\users\vagrant\desktop\openvpn-auth.conf"
(Get-Content "c:\users\vagrant\desktop\openvpn-auth.conf").replace('openvpn-passphrase', ${openvpn-passphrase}) | Set-Content "c:\users\vagrant\desktop\openvpn-auth.conf"
Move-item -force "c:\users\vagrant\desktop\openvpn-auth.conf" "c:\\program files\\OpenVPN\\config\\openvpn-auth.conf"

...
The script basically:
- sets the variables that are needed to connect our Elastic Agent to Elastic Cloud and to send logs to it
- uses the Chocolatey package manager to install the necessary software in addition to downloading some packages using PowerShell’s
Invoke-WebRequestand then unzipping them
The only part we’ll need to update are the first few lines. In our case, our updated configuration would like this:
# Define variables
## Elastic Agent / Fleet
Set-Variable -Name "elastic-version" -Value "8.1.1"
Set-Variable -Name "elastic-fleet-url" -Value "https://b9a2c2e2a0a54f8eb06655a03c0d4332.fleet.us-central1.gcp.cloud.es.io:443"
Set-Variable -Name "elastic-fleet-policy-enrollment-token" -Value "QXZKajNYOEJQelV3aGswU2JDWUg6bmtLb2tpWVdTQmFyVXdjNHNFaV9oZw=="
$ProgressPreference = 'SilentlyContinue'

Set-ExecutionPolicy Bypass -Scope Process -Force; [System.Net.ServicePointManager]::SecurityProtocol = [System.Net.ServicePointManager]::SecurityProtocol -bor 3072; iex ((New-Object System.Net.WebClient).DownloadString('https://community.chocolatey.org/install.ps1'))
To be on the safe side, we added an explicit line to install Chocolatey instead of depending on it being installed in the base image (make sure that this is added before any choco statements):
At this stage, if we’re using Virtualbox, we can run:
vagrant up
and connect to your VM as soon as it is provisioned. The first time it is provisioned may take a while as it downloads and installs the various components. If, on the other hand, we are on Linux/KVM, we still have a little more work to do.
Adding Linux/KVM Support
As mentioned in the Introduction, I don’t personally use Virtualbox. Instead, I run all my VMs on Linux’s native hypervisor, KVM. To support this setup, we’ll have to:
- install some additional software
- update our
Vagrantfile
Depending on the distribution we’re using, we’ll want to either install Vagrant from our distribution’s package repository or by directly downloading and installing it from the HashiCorp site as shown below:
curl -O https://releases.hashicorp.com/vagrant/2.2.14/vagrant_2.2.14_x86_64.deb
dpgk -i vagrant_2.2.14_x86_64.deb
Although there are more recent versions (2.2.19 as of the time of this writing), this is the one I’m currently using. Vagrant doesn’t support KVM out of the box, so we’ll have to install the libvirt provider. For instructions, refer to the Installation section https://github.com/vagrant-libvirt/vagrant-libvirt.
To communicate with our VM and allow us to run our provisioning script, we’ll use WinRM as WinRM is not installed by default on Linux. We can do this by installing the winrm gem:
$ vagrant plugin install winrm
$ vagrant plugin install winrm-fs
$ vagrant plugin install winrm-elevated
We also now need to update our Vagrantfile. The original file is available here. However, we can’t use it because it points to an image that is available in Virtualbox format and not supported by KVM. We could manually convert it to a format supported by KVM but we’ll just grab a box that supports KVM instead. We’ll update Vagrantfile to use this instead as well as making a few additional modifications:
Vagrant.configure("2") do |config|
  config.vm.define "windows-victim", primary: true do |cfg|
    cfg.vm.communicator = "winrm"
    cfg.ssh.insert_key = false
    config.vm.box = "peru/windows-10-enterprise-x64-eval"
    cfg.vm.synced_folder ".", "C:\vagrant", disabled: true
    cfg.vm.provision "file", source: "openvpn-auth.conf", destination: "c:\\users\\vagrant\\desktop\\openvpn-auth.conf"
    cfg.vm.provision "file", source: "vpn-connect.ps1", destination: "c:\\users\\vagrant\\desktop\\vpn-connect.ps1"
    cfg.vm.provision "provision-script", type: "shell", path: "provision.ps1"
    cfg.vm.provision "file", source: "openvpn.ovpn", destination: "c:\\program files\\OpenVPN\\config\\openvpn.ovpn"
    cfg.vm.provider :libvirt do |libvirt|
      libvirt.memory = 8192
      libvirt.random_hostname = true
      libvirt.cpus = 4
    end
  end
end
Finally, we have everything in place and can run:
vagrant up
to provision our VM. Provisioning may take a while as our box is downloaded and our provisioning script runs. To view its progress, we can use virt-manager to connect to the box.
Final Preparations
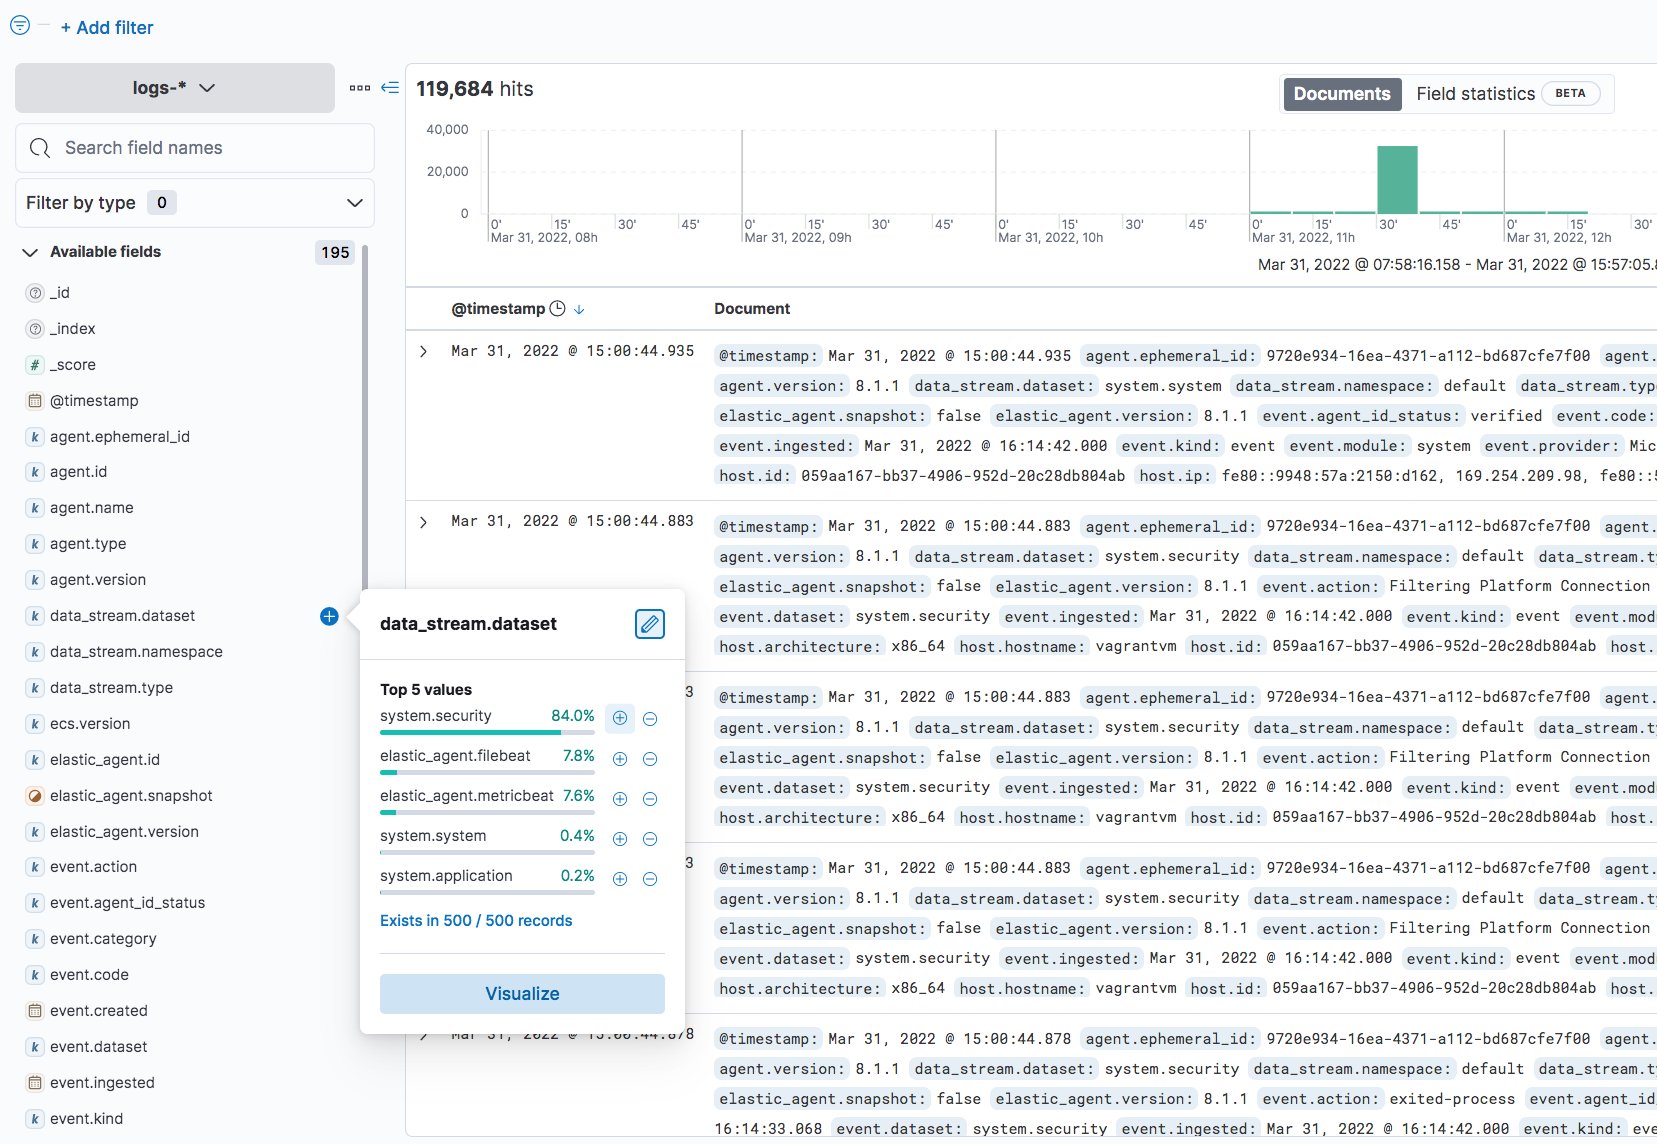
Now that we have our malware analysis box up and running and sending logs and other telemetry to Elastic Cloud, we can log into Kibana and view some of these logs. We can see that we’re getting logs from Winlogbeat, Filebeat and Metricbeat via Elastic Agent:
We’ve almost finished our prep work. There are two final steps that we’ll want to do before detonating any malware:
- Disable Windows Defender (Optional)
- Take a snapshot
Disabling Windows Defender
When trying offensive tools or deploying malware on our test VM, we may want to disable Windows Defender. This allows the malware / tool to run unhindered and we can use some of the artifacts it generates to threat hunt for variants that may have bypassed our endpoint security solution. There are a number of options. I’d recommend using [defender-control](https://github.com/qtkite/defender-control ). Yet another option is to enable a different EDR/AV solution. For example, the Elastic Agent supports running Endgame’s EDR agent. All you have to do is to update the agent policy and it should deploy it in a few minutes and disable Windows Defender while replacing it with its own.
If for some reason the above don’t work, there is a more direct method of just simply renaming the MsMpEng.exe binary. To do so, we’ll reboot using a Linux Live CD (we could also have just installed the used guestfs to mount the VM’s partition and modify it directly). We:
- download SystemRescueCD
- set our VM to boot from it
- once booted, we find out what partition is used by our Windows installation using:
fdisk -l. In the example below, it is/dev/vda1 we then run the following to find all instances of
MsMpEng.exeand rename them:mkdir -p /mnt/windows mount -t ntfs /dev/vda1 /mnt/windows find /mnt/windows/ProgramData/Microsoft/ -iname MsMpEng.exe -execdir mv {} MsMpEng.exe.bin \;- finally, we shutdown shutdown our VM and then change the boot order to boot from our Windows partition
Taking a Snapshot
Prior to testing out offensive tools or detonating malware, there’s one final step we’ll take. We want to snapshot our environment so that we can quickly rollback to a pristine state after when needed. We could simply delete the virtual machine and bootstrap a new one using Vagrant and be up and running with a pristine environment thanks to Vagrant, but rolling back is quicker and we’ll use Vagrant’s provisioning capabilities only when we need to roll out a new version of our box or when the Windows trail license expires.
If we’re using Virtualbox, taking a snapshot is straight-forward:
vagrant snapshot save pre-malware
and restoring it is as simple as:
vagrant snapshot restore pre-malware
If we’re using KVM, we have to add an extra step as libvirt doesn’t currently snapshot out of the box but we can use virsh commands:
## list VMs
$ virsh list
 Id   Name                                                                           State
----------------------------------------------------------------------------------------------
 3    windows-10-sandbox-to-elastic_windows-victim_1648685004_04e6ef9d15e26f6bcdaa   running
----

## take snapshot
$ virsh snapshot-create-as --domain windows-10-sandbox-to-elastic_windows-victim_1648685004_04e6ef9d15e26f6bcdaa --name "march31snap" --description "Before malware"

## list snapshots

$ virsh snapshot-list --domain windows-10-sandbox-to-elastic_windows-victim_1648685004_04e6ef9d15e26f6bcdaa
 Name          Creation Time               State
----------------------------------------------------
 march31snap   2022-03-31 13:19:43 +1100   running

## restore snapshot
$ virsh snapshot-revert --domain windows-10-sandbox-to-elastic_windows-victim_1648685004_04e6ef9d15e26f6bcdaa --snapshotname march31snap --running
We are now ready to simulate real world attacks and either:
- download and detonate malware in our VM
- attack our VM using various offensive security tools
and verify that our logging is sufficient and tweak it if necessary. We can also use this to start threat hunting using the Security App in Kibana.
Finding Malware Samples
DISCLAIMER As we’ll be detonating malware in this section, I’d highly recommend your lab setup be isolated from other systems in your environment. You’re responsible for any malicious activity originating from your victim machine. I’d also recommend running your malware through an online malware analyzer to get an idea of what it does. I’d start with VirusTotal as not only does it scan your binary but it also gives you an idea of the behavior of the malware in addition to providing you with links to sandbox reports under the Community section. It can also provide you with IOCs that you can use when threat hunting.
There are a number of malware sample sites that you can download samples from (or you can use your own). Malware Bazaar is one popular resource. It is constantly updated with hundreds of new samples daily. For illustration purposes, we’ll grab a copy of AgentTesla.
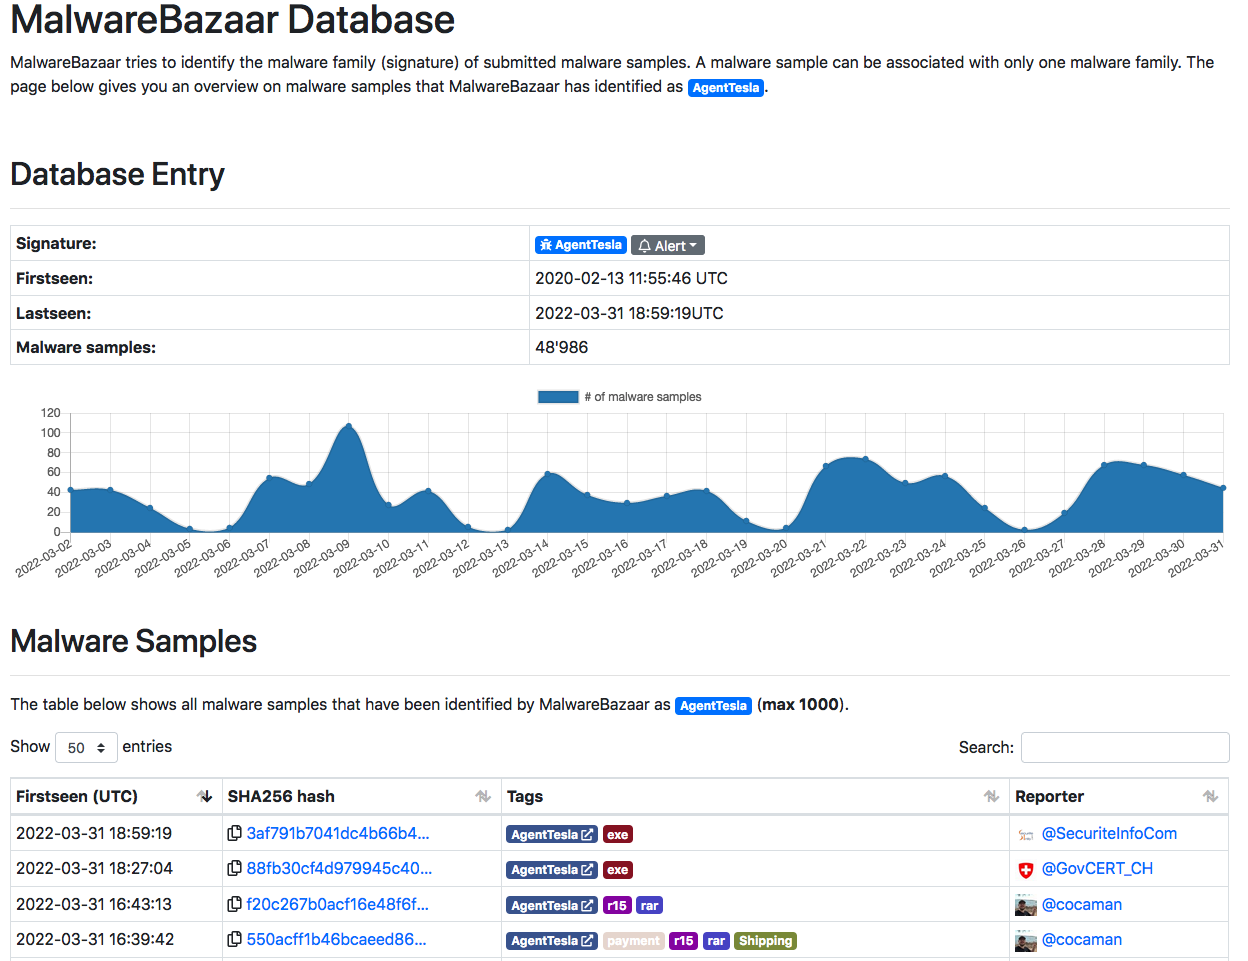
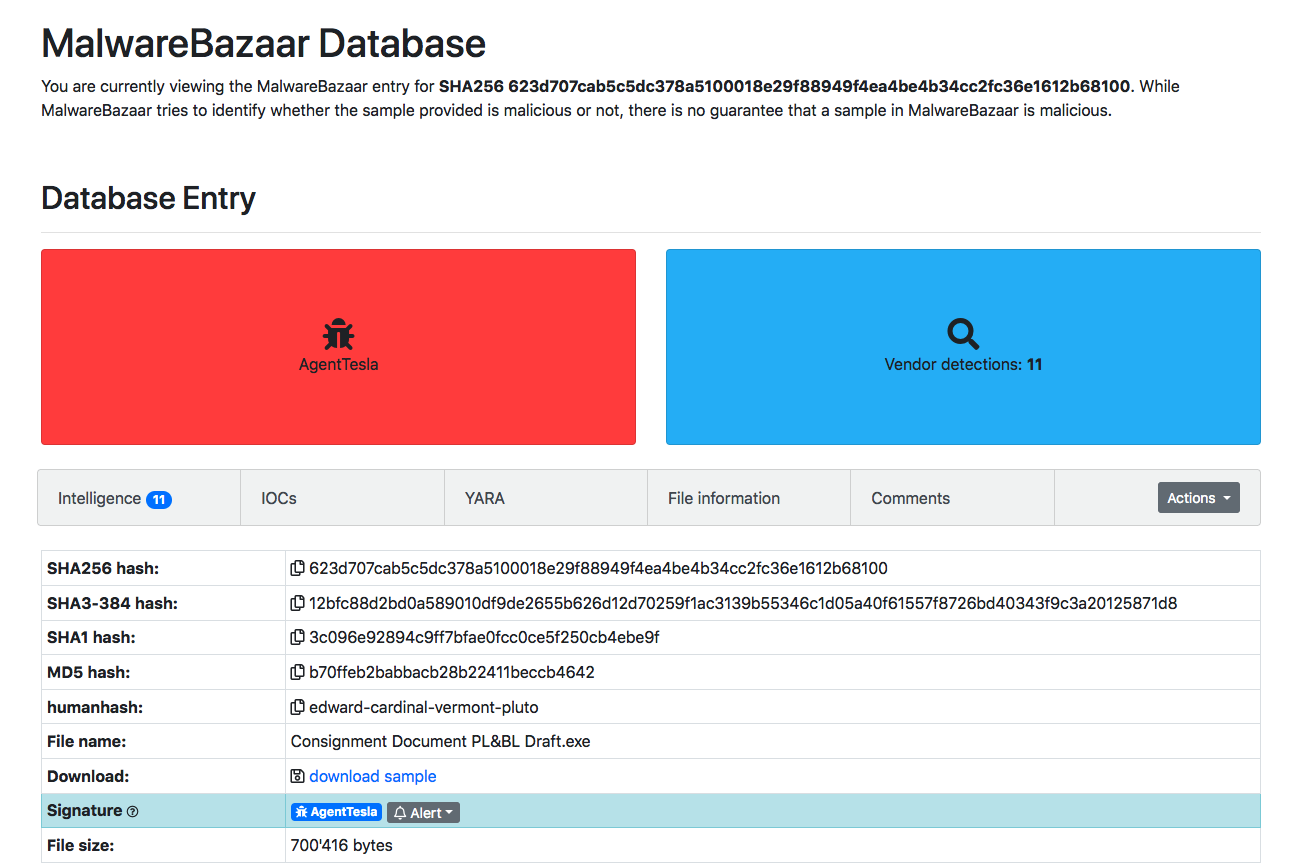
We start by uploading it to VirusTotal to get a better idea of what the malware does:
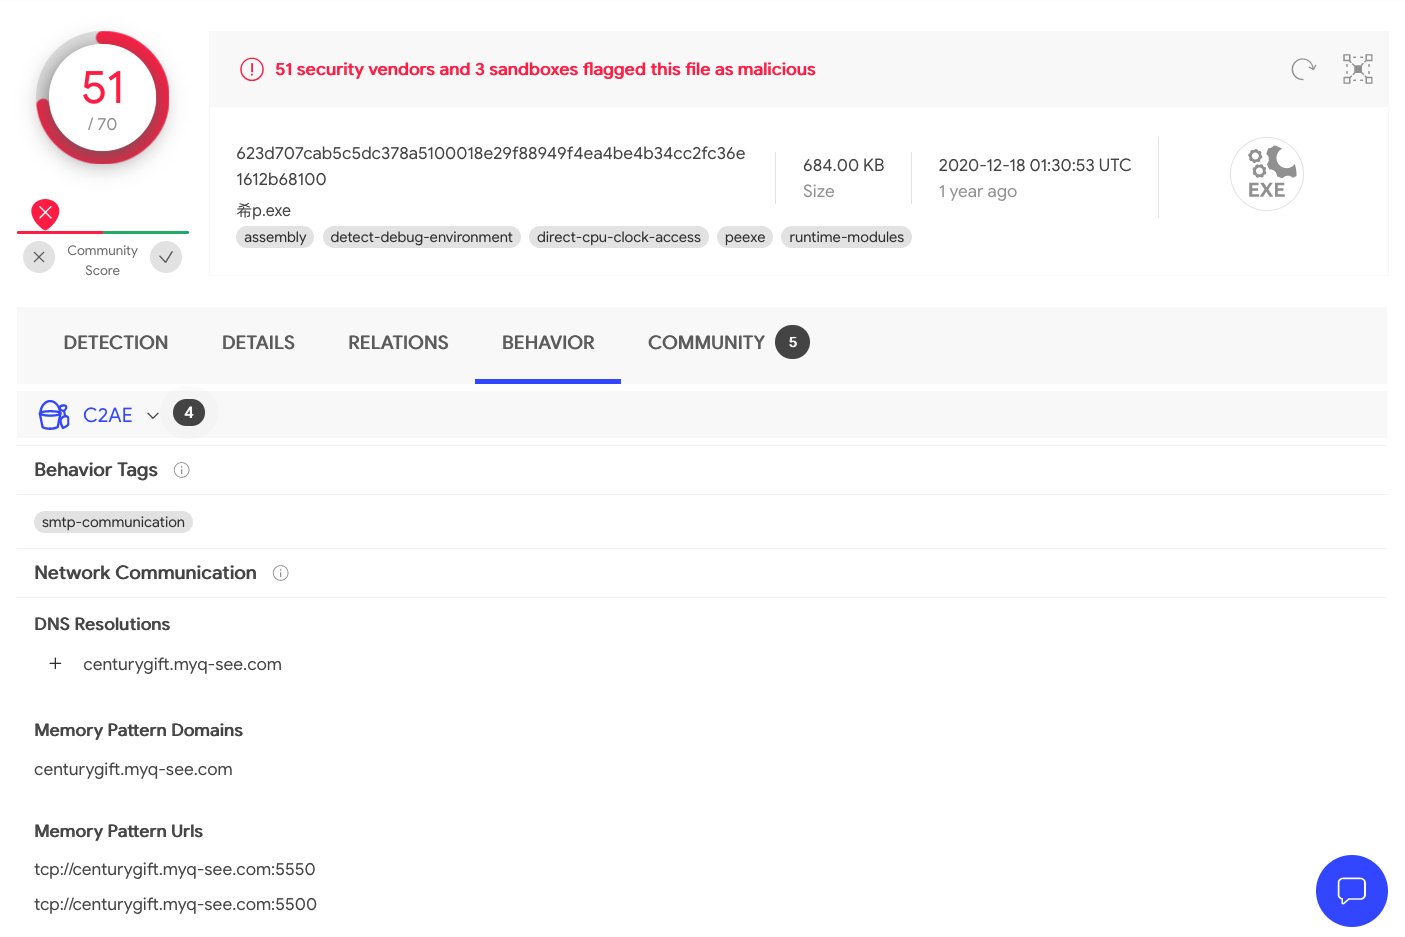
and can see if it was run through any public sandbox analyzers:
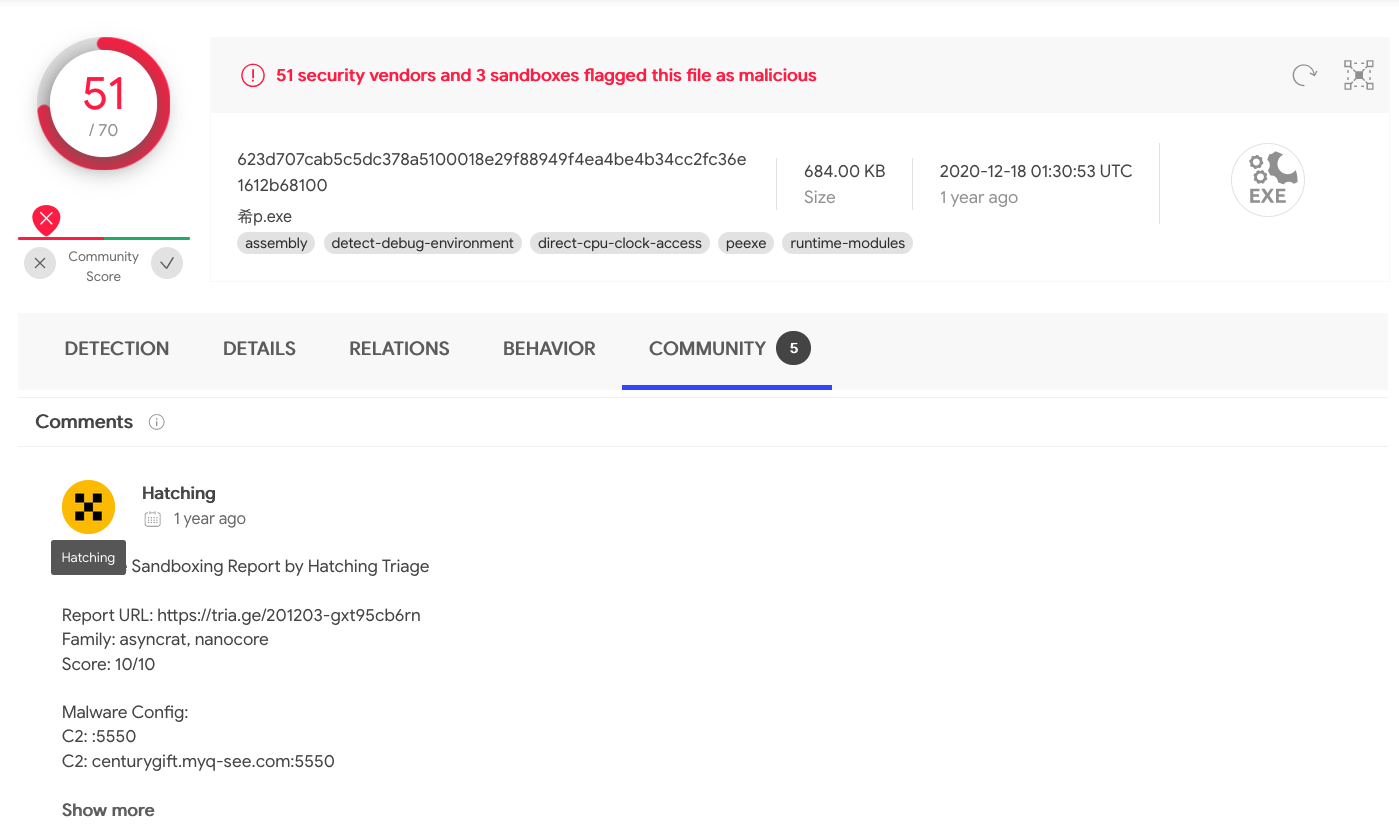
We can download the file and detonate it and see if what our Elastic Stack sees, including if any default alert rules are triggered (we’ll have to enable these in Kibana).
Threat Hunting
For threat hunting, the Elastic Stack comes with the Discovery App which you can use for general searching and deep diving into your logs and also comes with it’s SIEM application, the Security App. Elastic Stack also comes with hundreds of rules that we can enable (they are disabled by default) and are worth checking out:
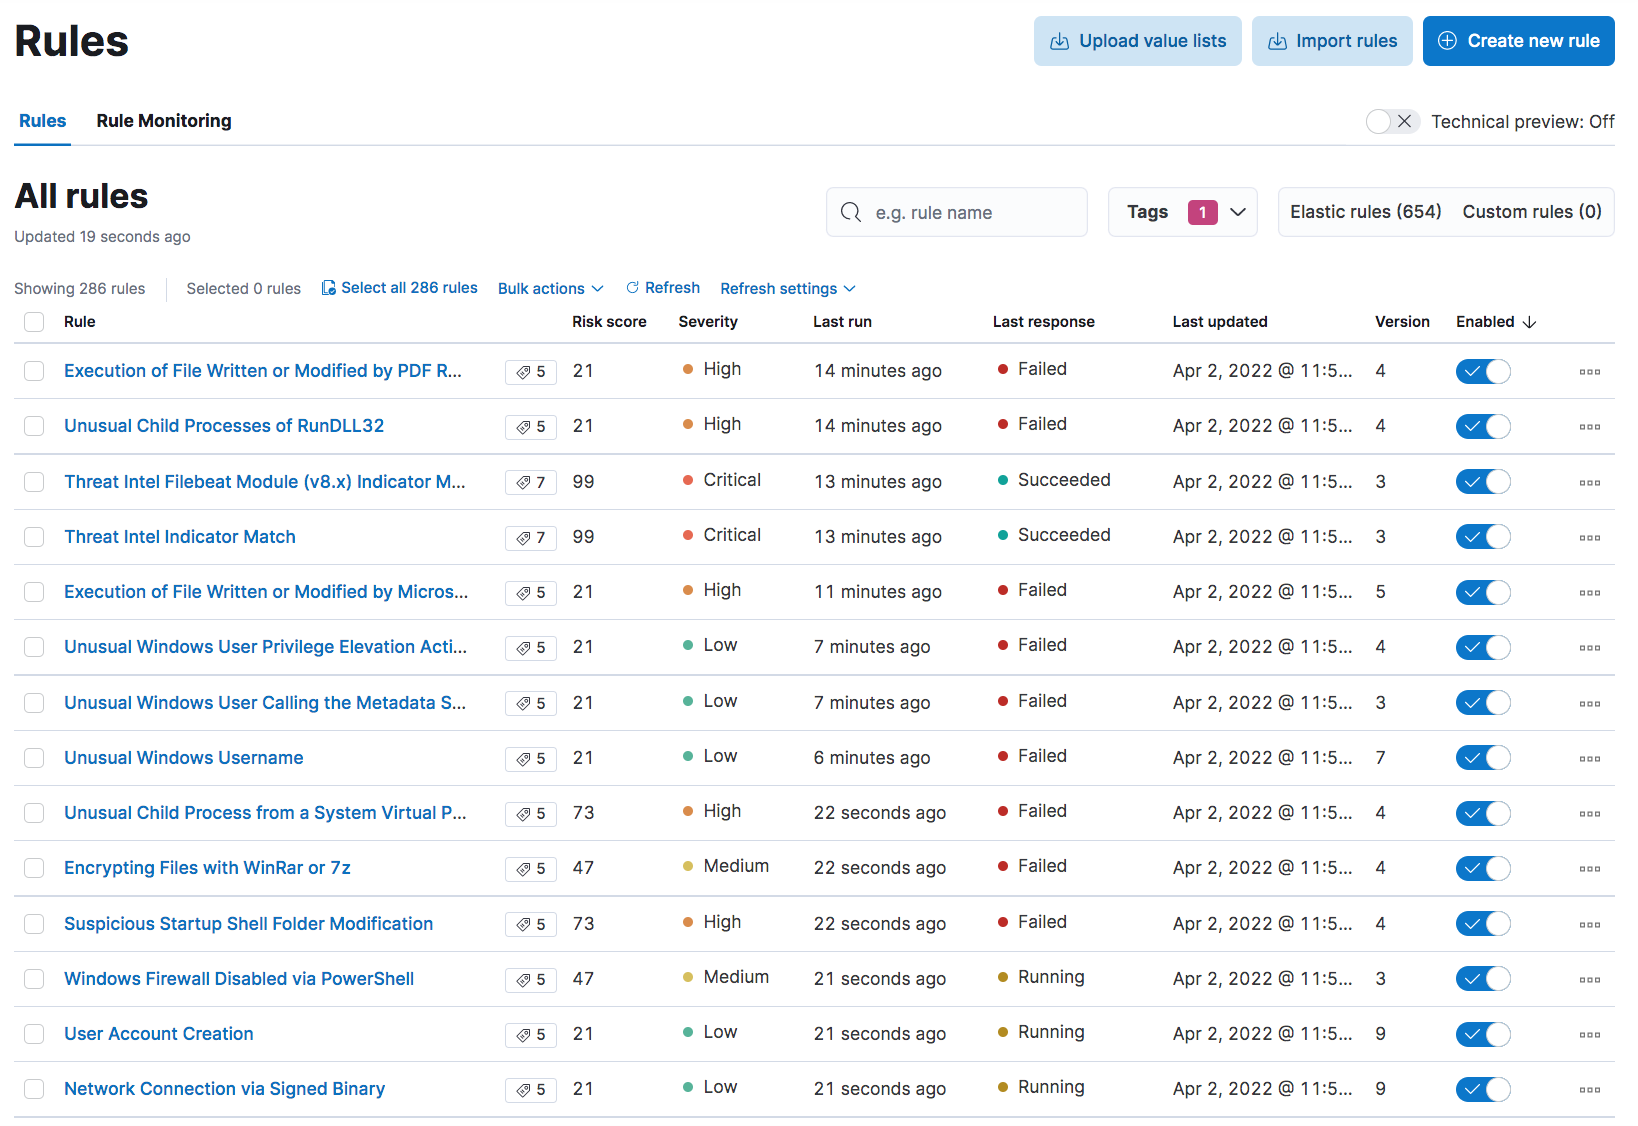
and you can write your own leveraging KQL and EQL queries, in addition to machine learning rules (not covered in the Free/Basic license). Useful quick wins such as Uncommon processes that allow us to quickly sift through outliers are included as part of Security App.
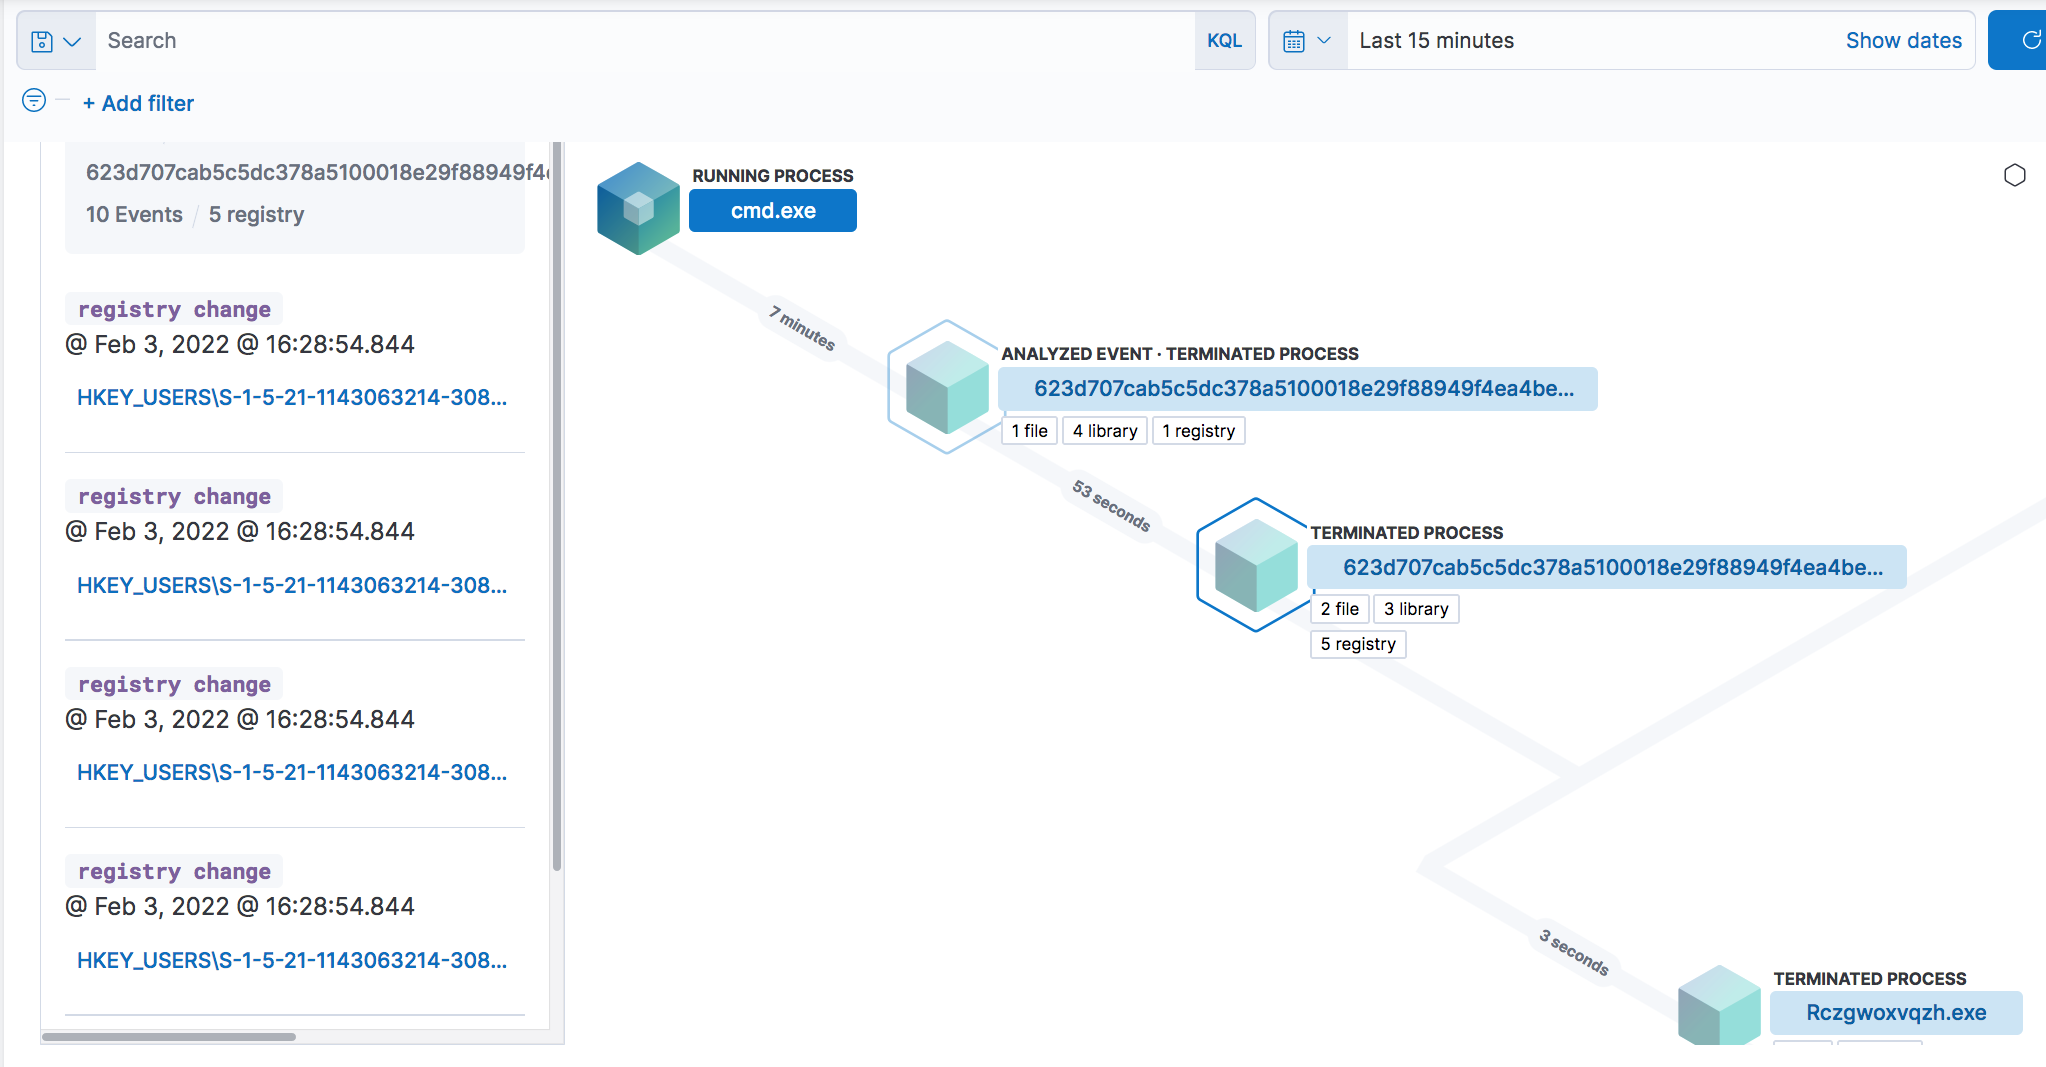
We can also use the dynamic malware analysis tools that are installed on the box to search for artifacts and use these to generate our own custom rules. If we do get an alert on one of our rules, we can leverage the Timeline feature or Resolver to get a high level view of what the malware did. For example:
This blog post won’t go into any additional details on using the Security App but, as I mentioned in the introduction, I’d recommend getting a copy of Andrew Pease’s book Threat Hunting with Elastic Stack for more.
Opensearch
OpenSearch is a fork of the Elastic Stack created by Amazon in 2021 due to licensing disagreements with Elastic.co, the developers of the Elastic Stack. It is primarily used to drive the Amazon OpenSearch Service and a few other log management solutions such as Logz.io. Unfortunately for OpenSearch users, the above setup doesn’t work. Instead, you would have to:
- configure and use different log shippers as Elastic Agent requires Elastic Stack. If you use Winlogbeat, Filebeat and other Beats, make sure that they are 7.10 or below. NXLog is another option
- build your own dashboards / use existing dashboards as OpenSearch Dashboards does not come with the Elastic Security app. Some of the Beats come with existing dashboards that you can use
- for alerting, you’d have to configure ElastAlert2. You’ll want to look at Sigma’s rules for your rule set (or some other source). You’ll also lose some of the native query options such as EQL although you may be able to work around it using a custom script that polls Elasticsearch and runs EQL queries for you
Conclusion
In this blog post, we’ve looked at how to build a dynamic malware analysis / sandbox and hook it up to the Elastic Cloud. Using Vagrant allows us to automate a lot of the heavy lifting and also allows us to create images / boxes that we can then quickly share with others or use for quick provisioning. Although only a single VM was shown, you can easily scale this to as many as you want, as long as you have the hardware to support it. All you’d have to do is to tweak your Vagrantfile as illustrated here. As I mentioned in the introduction, I’d highly recommend learning Vagrant if you’re a security professional. If you need to install additional tools, you can easily update the provision.ps1 provisioning script to add it.
One remaining issue is that the current solution requires Elastic Cloud and we only get a 14-day trial period. It would be preferable if we had our solution log to a local Elastic Stack setup and that’s a topic I hope to address in a future blog post.