Proxying Application Traffic
Through Tor

A quick look at how to proxy any application’s traffic through the Tor network.
- Introduction
- Installation
- Configuring and Running Tor
- Configuring Our Apps
- Verification
- Using it Programmatically
- Detecting Tor on Your Network
- Conclusion
Introduction
While working on another blog post, I touched lightly on using Tor as a SOCKS proxy and realized that it probably deserved its own blog post. While many are aware of using the Tor Browser, fewer are aware of using Tor to proxy your application traffic and a subset understand the limitations / issues you may run into. This blog post will cover configuring Tor as a SOCKS proxy for your applications including:
- how to configure applications that support SOCKS proxying
- how to proxy applications that only support HTTP proxies
- how to support other applications that do not support either of the above
- how to connect to SSH and OpenVPN servers through Tor
- limitations of some of the wrappers used to proxy traffic (such as proxychains, proxify, etc)
- how to proxy only certain sites through Tor
- how to proxy all your traffic through Tor
For more on how Tor works, I’d recommend reading the Tor: Overview. Also, you should keep in mind that Tor’s SOCKS proxy implementation only supports TCP connections and can not be used to proxy UDP traffic.
Enterprises should definetely block Tor traffic (although allowing it to access your public websites is a business decision). I added a small section on detecting Tor.
DISCLAIMER Tor is an important service for many so please don’t abuse it to perform anything illegal or to bypass security policies.
Installation
Out of the box, installing the Tor Browser and launching it on any operating system will automatically start a SOCKS proxy on port 9150. To verify this, we can run:
ubuntu@linux:~$ lsof -i :9150
COMMAND  PID    USER   FD   TYPE DEVICE SIZE/OFF NODE NAME
tor     2901 ubuntu   11u  IPv4  42609      0t0  TCP localhost:9150 (LISTEN)
However, in many cases, we would prefer to run it without having to run the Tor Browser. This is useful if we want to run it on headless devices or even just run it in the background as a service. To do so, we have to download and install the standalone Tor executable.
Linux
On Linux, we can simply:
sudo apt install tor
The exact command needed may be different on your distribution. Hopping over to: https://command-not-found.com/tor shows us the required command to install the package:
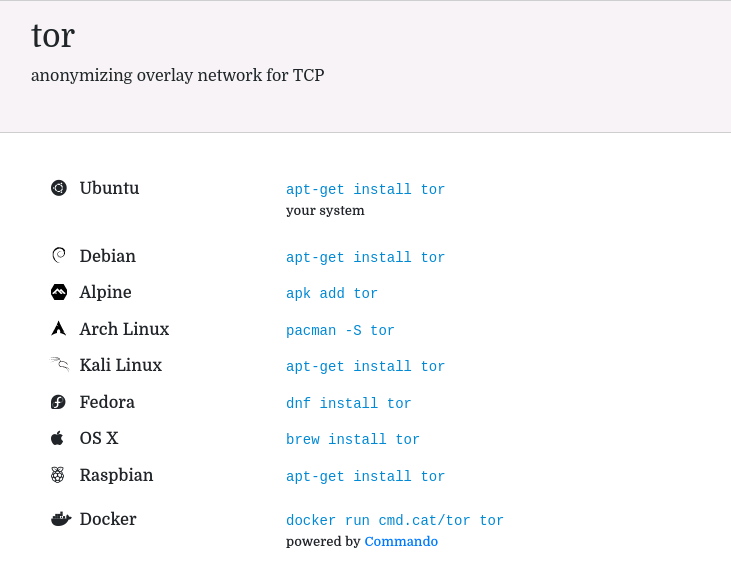
This provides us with just the tor binary in addition to other useful tools such as torify which allow us to run an application through Tor without having to explicitly configure it to use a SOCKS proxy.
To enable it to run as a service on system boot:
systemctl start tor
systemctl enable tor
Windows
On Windows, we would download the tor executable from: https://dist.torproject.org/torbrowser/11.0/tor-win64-0.4.6.8.zip. If desired, we could also run it as a System Service by running:
tor -service install
and placing the torrc file (more on this in the Configuration section) so that the account it runs under will find it. A simpler alternative is to have it run on user login by following the instructions here.
Mac
This is as simple as using Homebrew or Macports to install it:
$ brew install tor
Docker
Another option is to install and run the dperson/torproxy Docker container. This has the advantage of exposing both a Tor SOCKS proxy in addition to a traditional HTTP proxy that forwards requests to the Tor SOCKS proxy (for applications that don’t support SOCKS proxying).
For example:
docker run -p 8118:8118 -p 9050:9050 -d dperson/torproxy
and we can then direct our applications to use port 8118 as an HTTP proxy.
Configuring and Running Tor
Configuration is straight-forward but first, we have to find our configuration file torrc if we plan on using the Tor Browser:
- on Mac OS, this file is typically located at
~/Library/Application\ Support/TorBrowser-Data/Tor/torrc - on Linux, this file is located at
/etc/tor/torrc - on Windows, the torrc file is typically located under the path
\Browser\TorBrowser\Data\Tor\torrcunder the directory where the Tor browser was installed
If, on the other hand, we plan on launching it from the tor binary instead, we would just pass it in as a parameter:
$ tor -f <config_file>
Although there are a number of configuration options, the only one we really care about is SocksPort. This defines:
- the port to listen on
- the IP address to listen on (by default, it listens only on
localhost)
To have it listen only on the localhost interface port (this is the default if we don’t specify a configuration file), we specify only the port number:
SocksPort 9050
while we have to specify the IP address and port number if we want it to listen on a specific interface:
SocksPort 192.168.0.1:9050
We can use 0.0.0.0 if we want it to listen on all interfaces:
SocksPort 0.0.0.0:9050
Finally, we can specify that it binds to multiple IPs and ports. For example, this tells it to bind to port 9050 locally and bind to port 19050 on all interfaces:
SocksPort 9050
SocksPort 0.0.0.0:19050
If we configure it to listen on a non-localhost interface, we may want to specify which IP(s) can connect to it. We can do so through the use of SocksPolicy. In the below example, we specify that it accept requests only from the given network:
SocksPolicy accept 192.168.1.0/24
SocksPolicy reject *
This last option is useful if we are in a situation where we can’t install software on our current machine but have a machine within our network that we control.
Configuring Our Apps
When configuring our applications to use the Tor proxy, we have two options:
- configuring individual applications
- configuring all applications to go through the proxy
Configuring Individual Applications
Once our Tor proxy is up and running, we can then point our applications and tools to start using it. To do so, we would either:
- explicitly configure our application / tool to use it
- configure an environment variable that our application / tool looks at to determine if it should proxy requests or not
Unfortunately, there is no standard and some applications look at environment variables while others don’t. Some applications have support while others don’t, so it basically requires one to check the application’s documention on how to enable this. Another option is to use a wrapper that hooks underlying network functions (on Linux, this would typically be GLIBC) and proxies them for us. On Linux and Mac, we have a number of tools including: proxychains and torsocks while we have Torifier for Windows.
torify/torsocks for Linux/Mac
On Linux and Mac, the tor package gives us torify which can torify our applications. Other options that provide similar functionality include torsocks and proxychains (proxychains deserves its own blog post). By invoking it before our command, we can force connections through the Tor proxy. For example:
$ torify curl http://httpbin.org/ip
{
  "origin": "5.183.209.217"
}
A quick visit to https://metrics.torproject.org/exonerator.html verifies that this is indeed a Tor exit node IP:

Warning / Limitations
WARNING Tools such as torify and torsocks and proxychains only work if your application is dynamically compiled against GLIBC. This is the case for most applications but means that statically compiled applications or applications that don’t make use of GLIBC (like Go binaries) can’t be proxied using these tools. It is therefore better to explicitly specify the SOCKS proxy when possible when running our tools.
For example, bat, a curl-like tool written in Go isn’t impacted by torify’s hooking. So the below two commands behave identically:
$ bat http://httpbin.org/get
$ torify bat http://httpbin.org/get
We get no warning and our request goes directly to the target without going through Tor. In this case, we would check to see if the application itself has supports for using a SOCKS proxy. If not, we would check to see if it has support for HTTP(S) proxy and combine it with something like Privoxy to forward this traffic to Tor. In our case, bat only supports HTTP(S) proxies and we can quickly start a Docker image (refer to the Installation section) and proxy our requests successfully:
$ bat -proxy=http://192.168.1.200:8118 http://httpbin.org/ip
{
  "origin": "185.220.100.253"
}
As a final option, we could forward all of our traffic transparently through Tor and this would torify these applications (more on this later).
Torifier for Windows
If you’re still stuck in the 90s and still running Windows as your desktop environment, there is still hope. You may one day see the light and finally use a real operating system. In the meantime, we can use Torifier to easily proxify most applications. Once installed, we simply add the application we want to torify. Here is an example of SSH’ing using Putty which was torified:
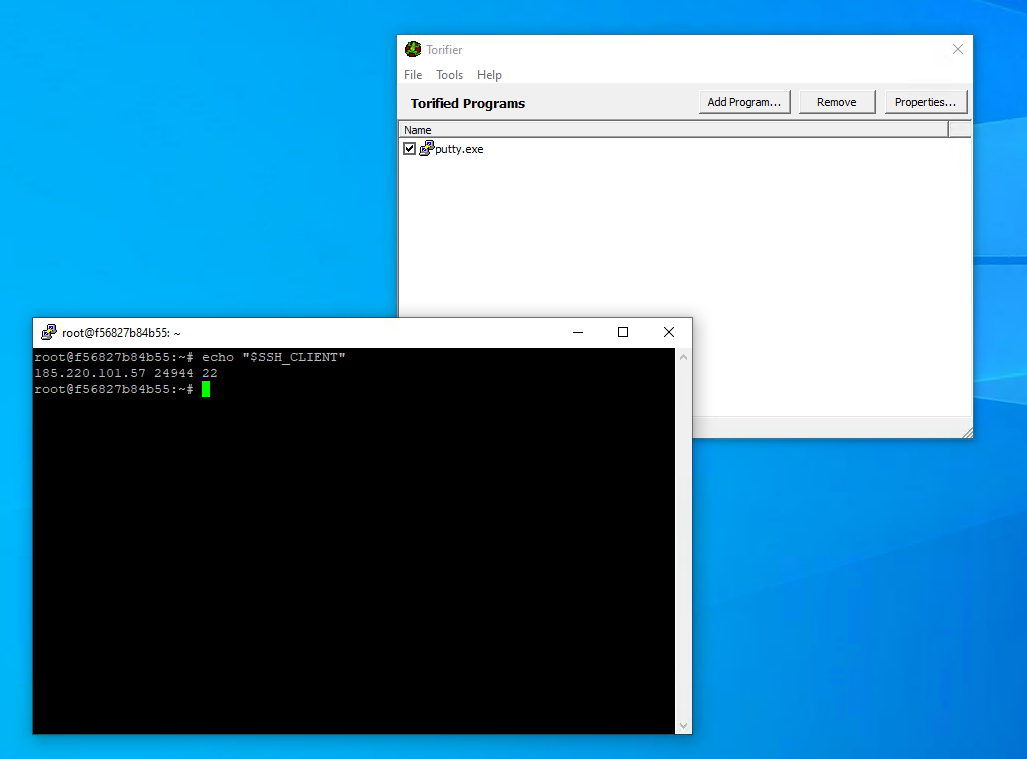
NOTE Unlike torify on Linux, Torifier is able to successfully proxy Go binaries such as bat.
SSHing Through Tor
In environments where outgoing SSH access is blocked, you can proxy your SSH traffic through Tor. Out of the box, SSH does not support proxying through a SOCKS proxy. However, we can use torsocks to our traffic:
$ torsocks ssh root@A.B.C.D -i ~/.ssh/id_rsa_digitalocean
or, as shown previously, use Torifier for Windows.
Another option is to use the ProxyCommand option in SSH. This option lets us hook standard input and output from the SSH client and forward them on its behalf. Using netcat (we could also have just used socat or corkscrew or any other application), we could run:
$ ssh -o 'ProxyCommand nc -x 127.0.0.1:9050 %h %p' root@A.B.C.D -i ~/.ssh/id_rsa_digitalocean
and even save it in our ~/.ssh/config:
Host digitalocean_socks
     HostName A.B.C.D
     IdentityFile ~/.ssh/id_rsa_digitalocean
     User root
     Port 22
     ProxyCommand nc -x 127.0.0.1:19050 %h %p
To verify that we are indeed going through the Tor network, we can inspect the SSH_CLIENT environment variable:
root@me:~# echo "$SSH_CLIENT"
185.220.101.46 21476 22
Running OpenVPN Over Tor
If we are in an environment where OpenVPN traffic is blocked, we can run our OpenVPN client over Tor. NOTE This will only work if our OpenVPN server runs in TCP mode (I’ll cover how to handle UDP mode in a future post). To verify this, we can simply inspect our ovpn configuration file:
$ cat client1.ovpn |  grep -i "remote "
remote 138.68.156.184 1194 tcp
Once confirmed, all we have to is to add a single line to our ovpn file:
socks-proxy 127.0.0.1 9050
and restart our OpenVPN client. Obviously, this is less than ideal due to the overhead added by the Tor network but in most cases, this is acceptable (unless we have to transfer large amounts of data). An alternative would be to use torify or a similar application but I prefer the above as it is platform agnostic.
Using Tor For Specific Sites Only
If we are in an environment where access to only specific domains is restricted and we would prefer not to have to proxy all our web traffic, we can configure our main web browser to proxy only traffic to these domains while bypassing it for all other websites for better performance. Two downsides to using Tor for browsing include:
- slower performance
- some sites block Tor traffic or demanding that you prove that you are human
One popular browser plugin that supports selectively proxying only certain traffic is SwitchyOmega which has plugins for both Firefox and Chrome. After installation, we then define our proxy/proxies and then define which domains should be routed by which proxy in addition to not proxying certain requests:

For example, if the httpbin.org domain was blocked in our environment, we can configure SwitchyOmega to use our proxy for this domain (it is recommended that you add a *. before the domain to cover all subdomains as shown below) while allowing all other traffic to bypass the proxy:
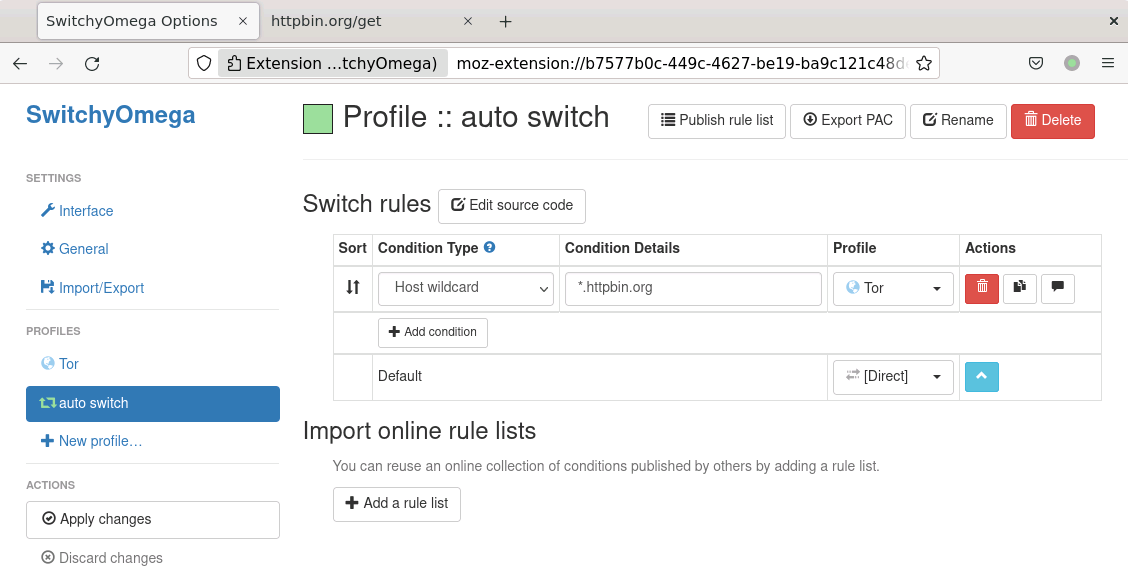
NOTE Make sure to click on the Apply Changes button after every change.
We can then verify that it works by visiting a site that displays our IP address and we can verify that it is no longer our real IP:
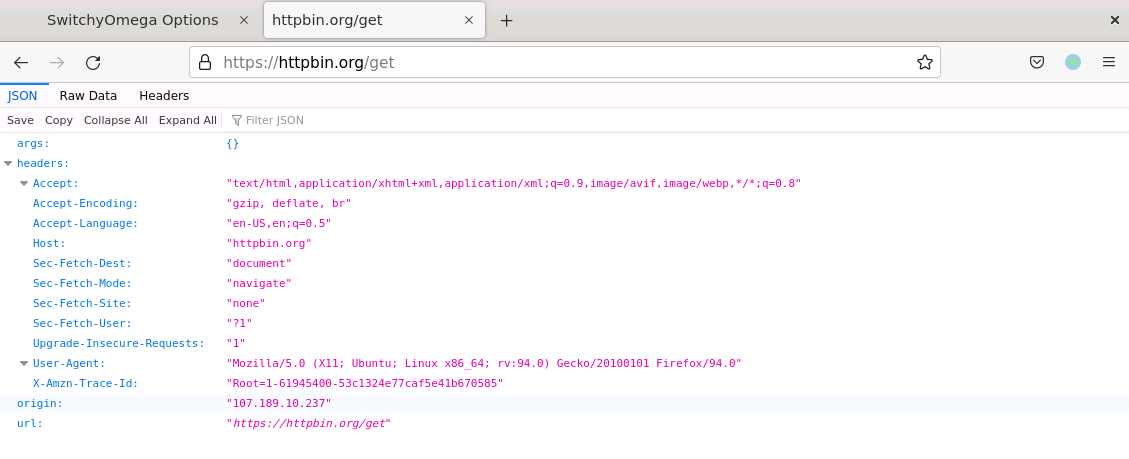
NOTE One interesting feature of SwitchyOmega is that you can export your configuration and share it with others.
Proxying All Our Traffic
One option is to proxy all our traffic through the Tor SOCKS proxy. However, this will not apply to UDP traffic as the SOCKS proxy that comes with Tor only supports TCP traffic. To do this, we have to configure what is known as Transparent Proxying. This typically uses a combination of:
- an application that takes outgoing traffic and modifies it to go through our SOCKS proxy
- firewall rules to transparently redirect outgoing traffic to this application
On Linux, redsocks fits the bill. Mac and Windows users can use a tool such as Proxifier or win2socks for Windows users. Another option for for Windows users is Tallow which allows us to proxy all our traffic (it drops UDP traffic) through Tor. It doesn’t provide the same anonymity features that the Tor Browser provides us with but does allow us to torify applications that don’t natively support SOCKS proxies. However, one caveat is that it torifies all traffic, including LAN traffic, which means we can’t connect to LAN resources while using it.
Verification
As mentioned previously, we should always verify if our traffic is actually being proxied or not. In some cases, proxifiers may fail (as seen previously when trying to run bat through torify).
Mac / Linux
For Mac and Linux, we can use the versatile lsof command. If we had a curl command that was running and wanted to verify if it was using our proxy or not, we could run the watch command below:
$ watch 'lsof -w -c curl -a -iTCP'
Every 2.0s: lsof -w -c curl -a -iTCP                                                                           dell: Fri Nov 12 15:48:33 2021

COMMAND     PID   USER   FD   TYPE  DEVICE SIZE/OFF NODE NAME
curl    1019390 ubuntu    5u  IPv4 2372612      0t0  TCP localhost:44946->localhost:9050 (ESTABLISHED)
The above switches tell lsof to:
-w- disable warnings-c- we are only interested in thecurlcommand-iTCP- we are only interested in TCP connections (lsof can list files, sockets and other details)
Another option on Linux is the ss command. For example, if we are interested in seeing what curl is currently connect to, we could run:
$ watch 'ss -uptown | grep -i "process\|curl"'
Every 2.0s: ss -uptown | grep -i "process\|curl"                                                               dell: Fri Nov 12 15:25:34 2021

Netid State  Recv-Q Send-Q          Local Address:Port       Peer Address:Port  Process

tcp   ESTAB  0      0                   127.0.0.1:35042         127.0.0.1:9050   users:(("curl",pid=965197,fd=5)) timer:(keepalive,58sec,0)
We added the process\| in the grep to get the output header. Personally, I prefer using lsof as it is more powerful and cross-platform.
Windows
To do so on Windows, we can use Nirsoft’s CurrPorts. In this example, I configured Firefox to use a SOCKS proxy whereas Edge was configured to not use one:
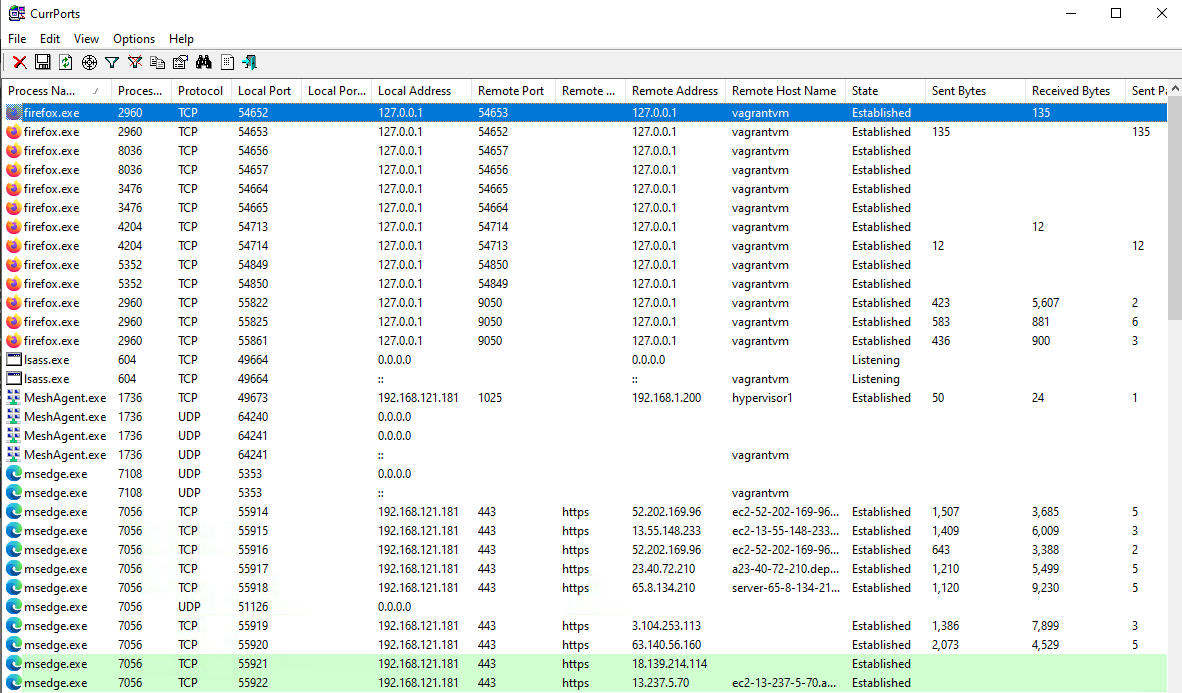
Interestingly, I noticed that some connections in Firefox aren’t using the SOCKS proxy. After further investigation, it appears that Firefox’s telemetry service bypasses your proxy settings. This thread validates this finding.
Using it Programmatically
Now that we have our TOR SOCKS proxy up and running, we can use it in our scripts and applications. We just have to make sure that we use a library with SOCKS support. On Python, the very popular Requests library supports this but requires that we install the PySocks module. Here is a simplified example of it in action:
import requests

URL = "http://httpbin.org/get"
proxy = "socks5://127.0.0.1:9050"
proxies = {"http": proxy, "https": proxy}
TIMEOUT = 15

resp = requests.get(URL, proxies=proxies, timeout=TIMEOUT)
print(resp.text)
When using it, we have to add a little extra time for our request due to the overhead in latency introduced by the Tor network. We can also tell it to tunnel our DNS request via the SOCKS proxy by using socks5h instead of socks5:
proxy = "socks5h://127.0.0.1:9050"
Detecting Tor on Your Network
Detecting and blocking Tor traffic in your enterprise environment is definitely something you want to do as it is used extensively by malicious actors. To block it, most network filtering devices either:
- block the IPs used by Tor
- inspect the SSL handshake and look for anomalies
On the wire, Tor traffic is basically TLS-encrypted traffic over TCP. However, there are some unique features of the SSL/TLS handshake that allow network devices to accurately detect it. For example, the client requests a non-existent domain as shown below:
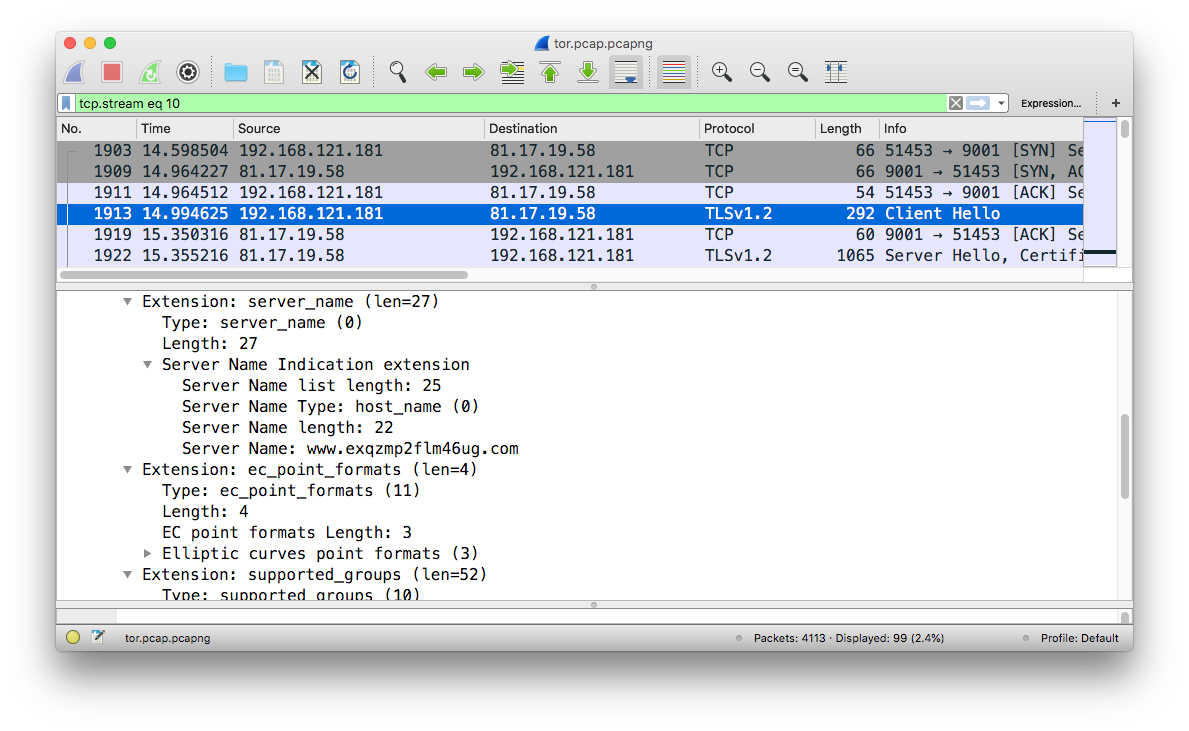
and we can confirm that this domain does not exist:
$ host www.exqzmp2flm46ug.com
Host www.exqzmp2flm46ug.com not found: 3(NXDOMAIN)
The server response to the SSL handshake is also suspicious. For a more complete and detailed analysis, I would recommend having a look at this article.
Conclusion
In this blog post, we’ve had a quick look at how to configure Tor as a SOCKS proxy for our applications, regardless of whether our applications support configuring a SOCKS proxy or not. Although there are other SOCKS proxy alternatives (such as OpenSSH’s SOCKS proxy and Dante), Tor’s SOCKS proxy is still useful in some use cases.