Searching Over a Billion Password Hashes
In Under a Millisecond

Using Bloom Filters to search over a billion password hashes in under a millisecond
- Introduction
- Solution
- Conclusion
Introduction
What’s the fastest way to search through over a billion password hashes? This is a question I ran into a few years ago while thinking of how I would go about developing an in-house Have I Been Pwned clone. Have I Been Pwned is a website that aggregates data breach hash dumps and allows users to check to see if any of their emails were included in a previous data breach. It also exposes a REST API to allow web developers to interact with it. A web application may use it to prevent users signing up to the application for using non-secure passwords that were previously leaked. Obviously, sending a copy of the password would be insecure so it allows you to either:
- send the complete SHA1 hash of your password instead (although this too can be a security risk)
- send the first few characters of the SHA1 hash and it will return all possible matches. This feature is referred to as k-anonymity and you can read more about it in this article.
But what if you would prefer not to have your application rely on an any external system to perform this check? In 2017, Troy Hunt, the developer of Have I Been Pwned shared over 300 million password hashes. There have been additional releases of password hash lists since and you can even get the current 1.3 billion password hash list (more on this later). Initially, one might think that storing this hash list in-memory or a database would be possible options. However, doing so would be in-efficient either due to:
- the memory required (if you plan on storing this in-memory as the password hash list is 50GB+ in size)
- the disk space required (again, the raw hash list is 50GB+ and storing it in a DB would take even more space, especially with the addition of an index for this list).
So what other option can we use to use to optimize both speed and disk space? At the time, I was looking into Splunk internals and how it speeds up searches through the use of Bloom Filters. A bloom filter is a compact data structure (a bit array) that allows us to quickly check if an item is a given set or not without having to add the actual item itself into the set. Our bit array is composed of bits set to zeroes. Each input string is run through a number of hashing functions which, if they result in a 1, would end up switching specific zeros in our bit array (all bits are set to zero before we start adding items) to ones as shown below:
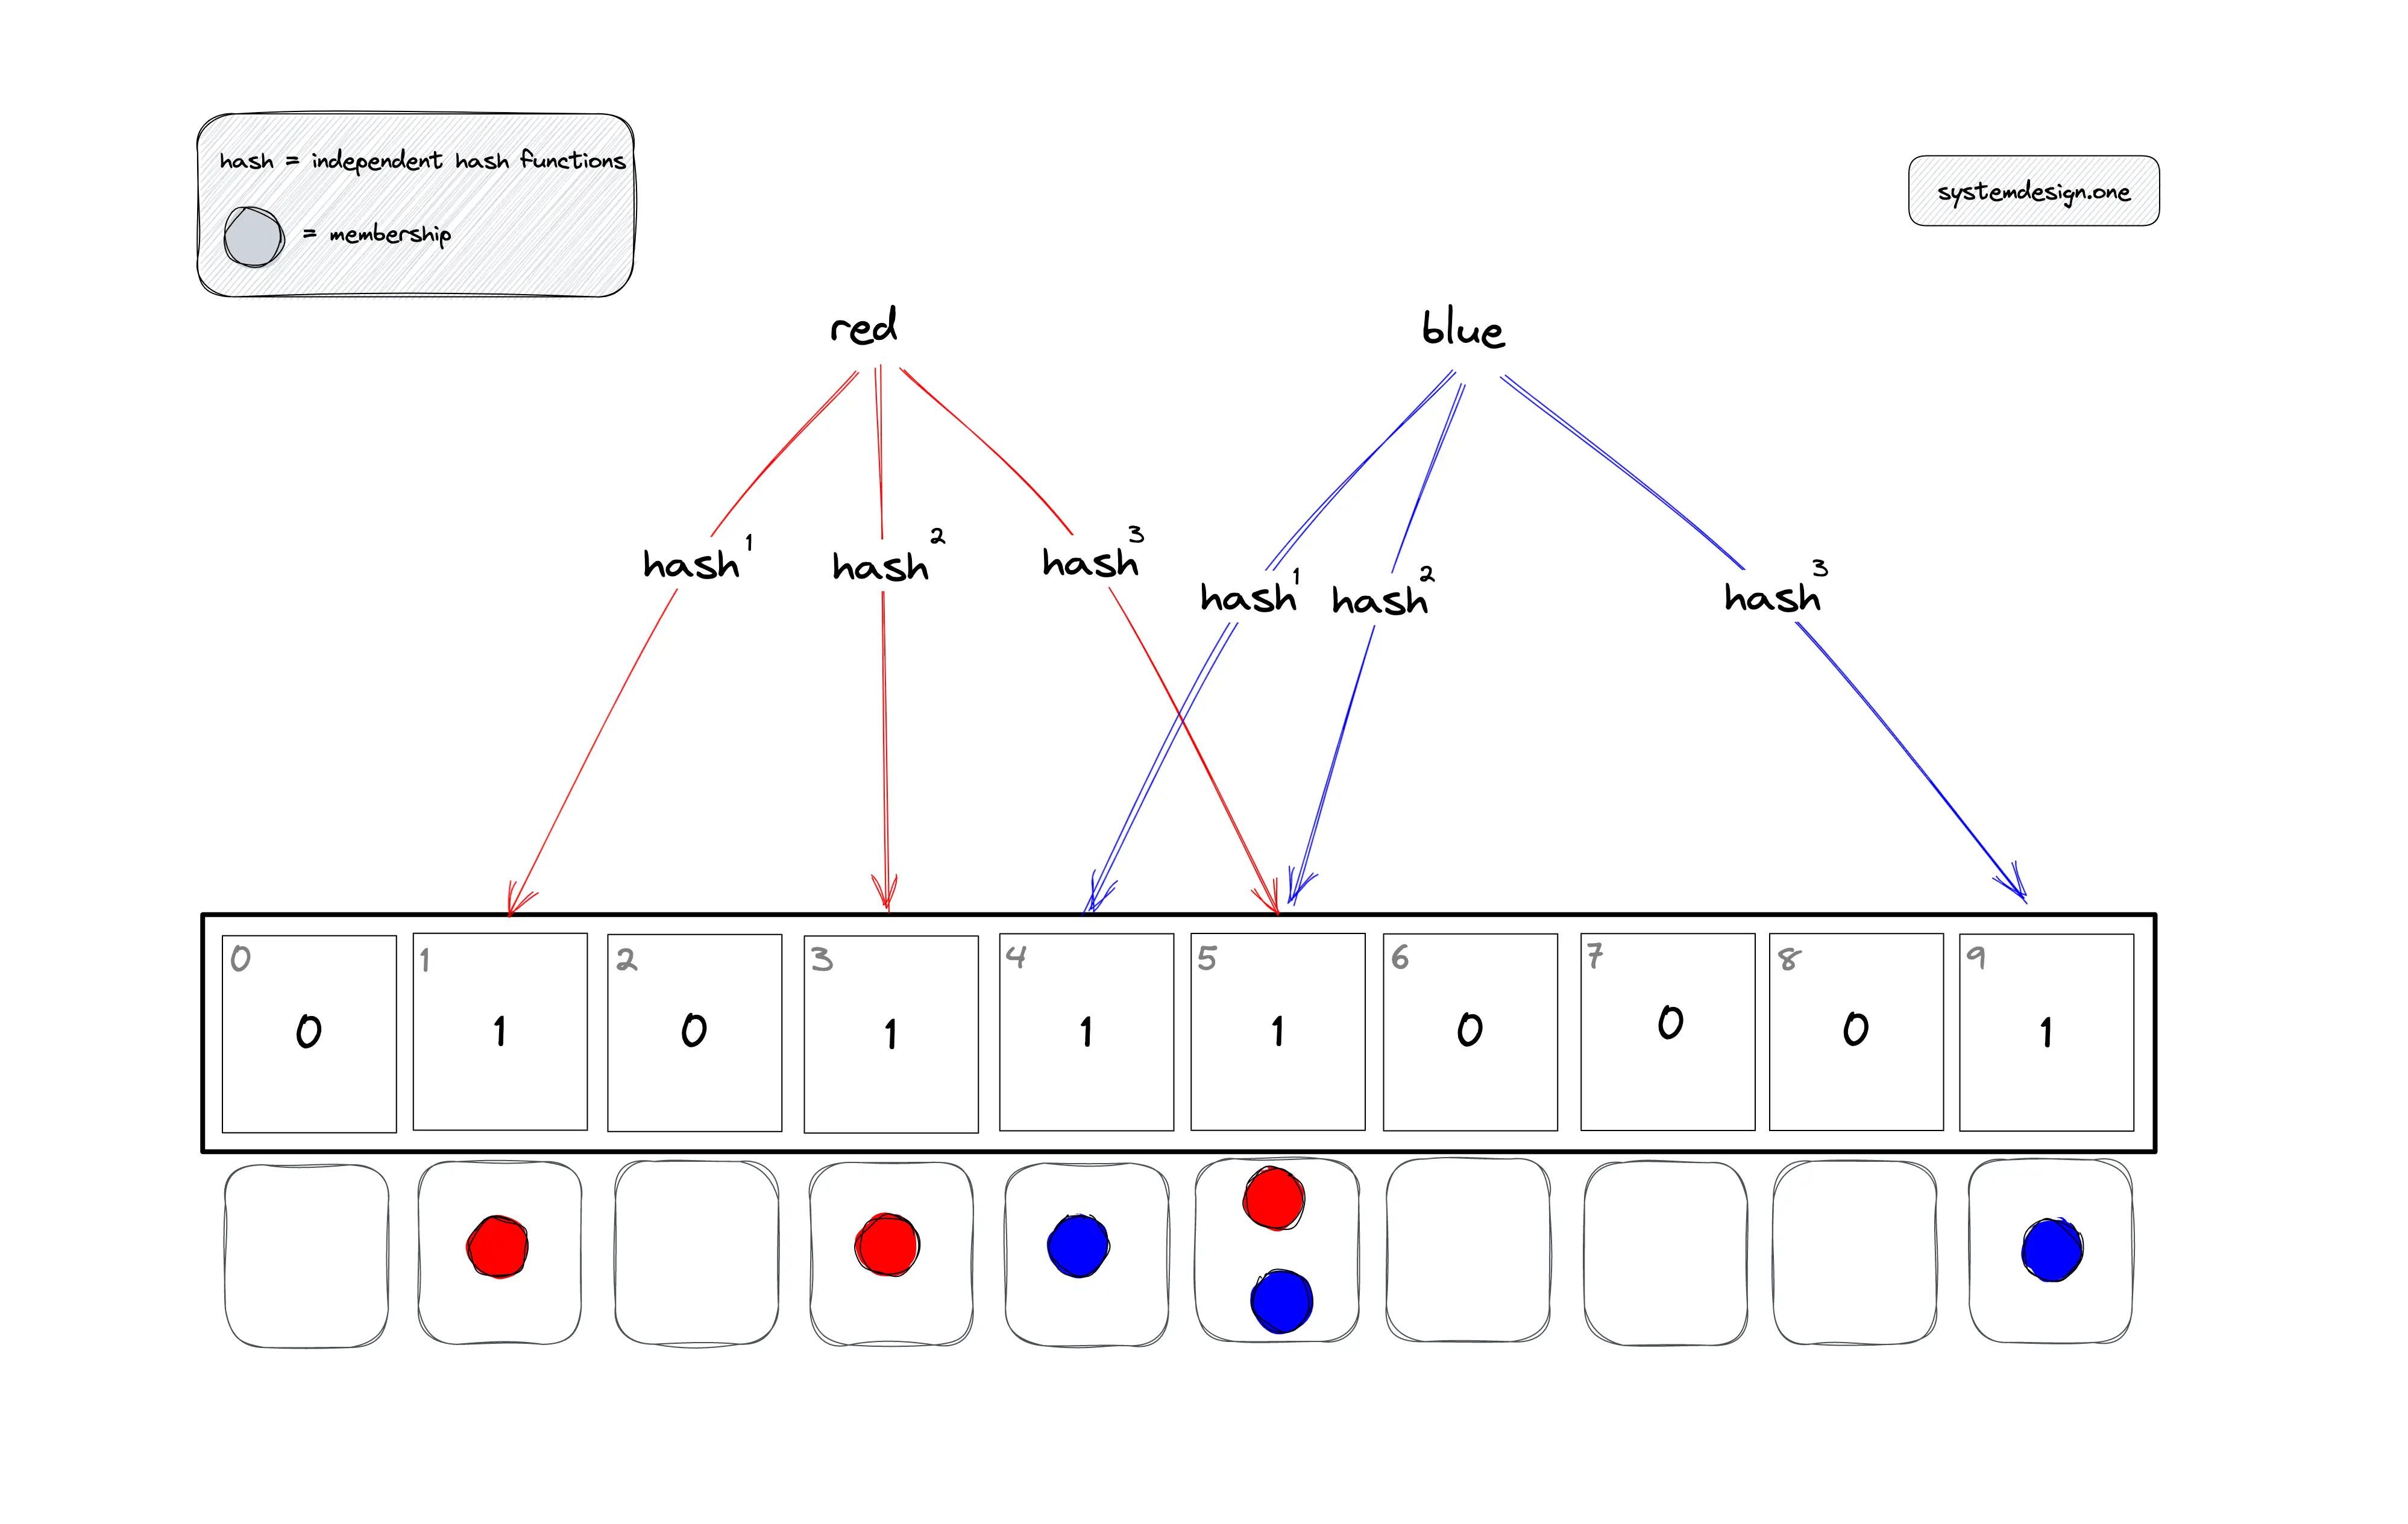
To check to see if we have previously seen a given input, the same check is made without modifying the bloom filter. If we find 1s in the corresponding bits, then we know that there is a high probability that we have previously seen this input string. The actual details on how it does so are best described in this article (the image taken above is from the article). Bloom filters have:
- some false positives
- no false negatives.
This means that if we create a bloom filter with our password hashes and then ask it if it has ever seen our hash before or not and it tells us that it has never seen the hash before, we can be certain that it has never seen the hash and the password has not been seen in a previous public data breach. If it tells us that it has seen the hash before, then we can be fairly confident that it has (but it might not have due to false positives). We can control the rate of false positives by creating larger bloom filters but can never total eliminate them. Our 53 GB data set of password hashes can be condensed down to 2.3 GB bloom filter with a 99.9% accuracy (so our false positives will be 1 in a 1000).
The example highlighted in this blow post isn’t meant to provide a production-grade solution but is instead meant to show how to use a bloom filter and the type of performance we can achieve using them. For a production-grade solution, we would probably:
- not care as much at getting the absolute best performance
- use a subset of the password hash list (the most commonly seen million or ten million passwords for example)
- return JSON responses
- add a test case
- setup a CI/CD pipeline
- clean up our cost
- use a more robust and maintained web application framework.
The proposed solution is built on Python due to its popularity but a production version might be built on Golang instead.
Solution
Downloading the HaveIBeenPwned Password Hash List
Our first task is to download the password hash list. To do so, we have a number of options including:
For demonstration purposes, we will be proceed with the pwned-passwords-ordered-by-count.7z hash file for reasons we will mention. The file has a little over half a billion password hashes:
$ wc -l pwned-passwords-ordered-by-count.txt
517238891 pwned-passwords-ordered-by-count.txt
Downloading a Previously Compiled Password Hash List
Previously compiled lists with a little over half a billion password hashes can be downloaded from either of the following torrents:
- pwned-passwords-2.0.txt.7z.torrent
- pwned-passwords-ordered-by-count.7z - this contains some a few additional entries and results in a 22 GB hash file after decompression.
Downloading the Current Password Hash List
NOTE Unless strictly required, I would recommend the other option as this option involves making over a million requests to CloudFlare and the files above already contain the majority of the most commonly found password hashes.
To download this list, we can use a tool such as PwnedPasswordsDownloader. This is a .NET tool. It makes use of the k-anonymity feature mentioned previously.
To download the list on Linux (Fedora in our example), we would do the following:
# install dotnet
# for Fedora: https://learn.microsoft.com/en-us/dotnet/core/install/linux-fedora?tabs=dotnet9
sudo dnf install dotnet-sdk-9.0

# download the GitHub repo
git clone https://github.com/HaveIBeenPwned/PwnedPasswordsDownloader
cd PwnedPasswordsDownloader/src

# install it
dotnet new tool-manifest
dotnet tool install haveibeenpwned-downloader

# download the password hash list
dotnet tool run haveibeenpwned-downloader pwnedpasswords
This results in a 53 GB pwnedpasswords.txt file with roughly 1.3 billion hashes:
$ wc -l pwnedpasswords.txt
1306741361 pwnedpasswords.txt
Preparing Our Data
Once our password hash list has been downloaded, we then move on to preparing it for our bloom filter. Out of the box, our password file looks like this:
$ head pwned-passwords-ordered-by-count.txt
7C4A8D09CA3762AF61E59520943DC26494F8941B:22390492
F7C3BC1D808E04732ADF679965CCC34CA7AE3441:7481454
B1B3773A05C0ED0176787A4F1574FF0075F7521E:3752262
5BAA61E4C9B93F3F0682250B6CF8331B7EE68FD8:3533661
3D4F2BF07DC1BE38B20CD6E46949A1071F9D0E3D:3006809
7C222FB2927D828AF22F592134E8932480637C0D:2840404
6367C48DD193D56EA7B0BAAD25B19455E529F5EE:2803614
20EABE5D64B0E216796E834F52D61FD0B70332FC:2425568
E38AD214943DAAD1D64C102FAEC29DE4AFE9DA3D:2391888
8CB2237D0679CA88DB6464EAC60DA96345513964:2308872
with each SHA1 hash followed by the corresponding number of times the hash has been seen in various data breaches. The first of these, 7C4A8D09CA3762AF61E59520943DC26494F8941B, corresponds to the popular password: 123456 and has been seen over 22390492 million times (as of the time of the release of the hash file). However, we are not interested in the counts. To remove them, we can either:
- Python functions such as
str.split,str.partitionor regex in Python - CLI tools such as
awkorcut.
As preparing our bloom filter is not an activity that we will perform often, speed is not essential and adding a few additional seconds or minutes is a non-issue. We will use the Python string split function (this will be illustrated in the next section) for convenience. Once we have our data with only the hashes, we can then move forward with building our bloom filter.
Building Our Bloom Filter
There are a number of Python libraries that support Bloom Filters. The best one in my opinion is pybloomfiltermmap3. This is still actively being maintained and supports both:
- in-memory bloom filters (with the ability to pickle / serialize and unpickle bloom filters)
- storage-backed bloom filters with memory-mapped files. This has several advantages including:
- removing unnecessary system calls when reading and writing to the file
- multiple processes can read the file.
To set things up, we will create a virtual environment using the excellent uv Python package and project manager. We will use Python 3.12 as our web application framework requires a feature that was removed in Python 3.13:
uv venv --python 3.12 --seed
source .venv/bin/activate
uv pip install pybloomfilter3
Our source code to create our bloom filter looks as follows:
from pybloomfilter import BloomFilter

"""
We don't need to calculate the optimal size of our filter as this is calculated
for us.
"""
# we create the filter and tell it:
## how many items we plan on storing (520000000)
## the false positive rate
## the file to write the bit array to
filter = BloomFilter(520000000, 0.001, '/home/vagrant/filter.bloom')
i = 0

with open("/home/vagrant/PwnPasswords/pwned-passwords-ordered-by-count.txt") as f:
   for line in f:
       filter.add(line.split(":")[0])
       i += 1
       if not (i % 1000000):
           print(i)

# quick test
print("Should be true")
print("247731C75F3B277594AFE05F8B1D0EE049DA0B08" in filter)
print("Should be true")
print("F8517D0EF5B383BD83571C7809D202D2014DA7D0" in filter)
print("Should be false")
print("F8517D0EF5B383BD83571C7809D202D2014DA7DA" in filter)
The code is straight-forward and the bloom filter-specific parameters are explained inline. After a few minutes, we have our bloom filter and have verified that it passes the preliminary tests we have within our file above. The size of our bloom filter file is 892MB in size. If we are willing to access a high false positive rate of 10% instead of 0.1%, this drops to a little over 300MB in size.
Developing Our Web Application
To expose our bloom filter, we will build a web service. As mentioned previously, in a production environment, we would not focus solely on performance but we’ll try to see how fast we can get for the fun of it. We’ll use the lightning fast and minimalistic Japronto framework (in real-life, you would typically use something else as development on Japronto has ceased). As described by its author, Japronto is a “screaming-fast Python 3.5+ HTTP toolkit integrated with pipelining HTTP server based on uvloop and picohttpparser” and, as we’ll see, it is exceptionally fast.
We start by installing the following requirements in our Python virtual environment:
uv pip install setuptools
uv pip install uvloop
uv pip install loguru
and then cloning and installing Japronto:
git clone --depth=1 https://github.com/squeaky-pl/japronto
cd japronto/
python setup.py install
However, compilation fails with the following error:
...
src/japronto/protocol/cprotocol.c: In function 'Gather_flush':
src/japronto/protocol/cprotocol.c:418:30: error: lvalue required as left operand of assignment
  418 |       Py_SIZE(gather_buffer) = (ssize_t)gather->len;
      |                              ^
error: command '/usr/bin/cc' failed with exit code 1
Looking up the compiler’s error message: lvalue required as left operand of assignment points us into changing the = into a ==. Doing so allows us to compile the library successfully (an investigation into this is probably worthwhile but as this blog post is meant as a demo and not a production-grade solution, we’ll proceed for the time being. Furthermore, basic functionality tests shows that our application performs as intended with no integrity issues or memory leaks).
Our web application is as follows:
from japronto import Application
from pybloomfilter import BloomFilter
from loguru import logger
import signal

true_count = 0
false_count = 0
filter = BloomFilter.open("/home/vagrant/filter.bloom")
app = Application()


def verify_hash(request):
    global true_count
    global false_count

    text = request.match_dict["hash"] in filter
    if text:
        true_count += 1
    else:
        false_count += 1
    if not ((true_count + false_count) % 1000000):
        logger.debug(true_count)
        logger.debug(false_count)
    return request.Response(text=str(text))


app.router.add_route("/hash/{hash}", verify_hash)

app.run()
The above web application will route requests with /hash/<input> to the verify_hash function which:
- checks to see if the hash is found in our bloom filter
- updates the
true_countandfalse_countcounters - logs the count of both
true_countandfalse_countevery million requests (this will also help us calculate the performance of our solution as benchmarking tools sometimes provide inaccurate results) - return
Trueif the hash is found in our bloom filter andFalseotherwise. In a production environment, we would probably return a JSON response instead.
Finally, to run our application, we would simply run:
python bloomfilterapp.py
Testing Our Bloom Filter
To benchmark our web application, we will use wrk, a modern HTTP benchmarking tool. wrk supports using Lua to customize our requests which is key as we would like to send millions of unique SHA1 hashes requests to our web application. To install wrk, we follow the instructions mentioned over here and would install the LuaJIT and OpenSSL dependencies if we need these features (we will use the LuaJIT functionality but already had the LuaJIT library installed):
git clone --depth=1 https://github.com/wg/wrk
cd wrk/
make
sudo make install
To test our web application and underlying bloom filter that it uses, we want to send different SHA1 hashes per requests. To do so, we can use the multiplepaths.lua Lua script. multiplepaths.lua looks for a paths.txt file with URL paths to add to the base URL when sending requests to our target web web application. For example, if paths.txt looked like this:
/hash/0CB4ACE5A8894BB6966E6FDABB2237C9DD771C43
/hash/EF6D67DBDC4FE801179B7908C689DBAE85BD7B44
and we pointed wrk to http://localhost:8000/, we would end up with requests to:
http://localhost:8000/hash/0CB4ACE5A8894BB6966E6FDABB2237C9DD771C43
http://localhost:8000/hash/EF6D67DBDC4FE801179B7908C689DBAE85BD7B44
We would do the following:
- extract a subset of password hashes for testing
- point
paths.txtto our password hash file.
To extract a subset of password hashes for testing, we can use sed to extract a few million SHA1 hashes from our original data set of SHA1 hashes. In the below snippet, we:
- extract lines
51000000to55000000for a total of 4 million password hashes - remove the count corresponding to each hash as it is not needed
- prepend
/hash/to each entry as our web application looks for hashes under/hash/<hash>
sed -n '51000000,55000000p;55000001q' pwned-passwords-ordered-by-count.txt > /tmp/temp1
cut -d ":" -f 1 /tmp/temp1 > /tmp/temp2
sed 's$^$/hash/$' /tmp/temp2 > /tmp/passwordhashsubset
Our /tmp/passwordhashsubset now looks like this:
/hash/0CB4ACE5A8894BB6966E6FDABB2237C9DD771C43
/hash/EF6D67DBDC4FE801179B7908C689DBAE85BD7B44
/hash/87C0943E9377B13520E11B92FFFFB67B6ABD4FEC
We then point paths.txt to our password hash file:
ln -s /tmp/passwordhashsubset paths.txt
Finally, we run our benchmark:
$ wrk -c 10 -t 10 -d 20s -s multiplepaths.lua http://localhost:8080/
multiplepaths: Found 4000001 paths
multiplepaths: Found 4000001 paths
...
Running 20s test @ http://localhost:8080/
  10 threads and 10 connections
  Thread Stats   Avg      Stdev     Max   +/- Stdev
    Latency   107.85us  398.00us  31.86ms   99.68%
    Req/Sec    10.50k     5.78k   36.49k    88.01%
  3290823 requests in 20.09s, 260.49MB read
  Non-2xx or 3xx responses: 9
Requests/sec: 163801.04
Transfer/sec:     12.97MB
After running our benchmark for 20 seconds, we get an impressive 160000+ requests per second (with over 3,200,000 requests sent in 20 seconds). If we look at the output of our web application, we see the following:
Accepting connections on http://0.0.0.0:8080
2025-08-31 21:53:12.219 | DEBUG    | __main__:verify_hash:23 - 1000000
2025-08-31 21:53:12.220 | DEBUG    | __main__:verify_hash:24 - 0
2025-08-31 21:53:24.392 | DEBUG    | __main__:verify_hash:23 - 2000000
2025-08-31 21:53:24.393 | DEBUG    | __main__:verify_hash:24 - 0
2025-08-31 21:53:37.042 | DEBUG    | __main__:verify_hash:23 - 3000000
2025-08-31 21:53:37.042 | DEBUG    | __main__:verify_hash:24 - 0
We notice two things:
- as expected, all password hashes were found in our bloom filter
- if we look at the timestamps and the and number of hashes processed, we calculate the following:
2000000 / (21:53:37.042 - 21:53:12.219) = 80570 requests / secondSo it appears that wrk for some reason gave us double the actual throughput. However, 80K requests per second is still very impressive.
Checking the False Positive Rate
To check that its false positive rate is close to what we expected (0.01%), we will generate random SHA1 hashes and then send them to our web application. Given that the range of possible SHA1 hashes is 2^160 = 1461501637330902918203684832716283019655932542976, it is statistically unlikely that it will generate a SHA1 hash that was found in our password hash file.
To generate this list, we will use this small Python script to generate the random SHA1 hashes:
import random

with open("/tmp/randomhashes", "a") as f:
    for i in range(4000000):
        f.write("/hash/" + hex(random.getrandbits(160))[2:-1].upper() + "\n")
Our generated file looks like this:
/hash/2AF680B7A92FD5F2FC246CEB50FABC4C1F8E614
/hash/7A2021E7F906F7E10DB3B14A7185D409264C235
/hash/920D5F08B1F01CBD8C294A8CC17A0D48F875CBE
/hash/462DEFD74EFE116FF86C600FA3006F150D233E0
/hash/E5A9C49511428B22399479103E758F8DA3ED82E
/hash/1761CD2D91FC13D72963093F9B374F3D12DEEA1
/hash/FE96FC75F43DEDA10CEDC7B991B6CE21B2A84DF
/hash/9636C4ADD9E73E18A1122CD9E2627F7F8E2904E
/hash/76961288E9923299E00B8BB5DD74808B1273A03
/hash/5031F39AC7A05F56BF5FEBCFC2EA3392EDDB59A
...
We then run the web application:
$ python haveibeenpwned.py
and then run wrk:
$ ln -s /tmp/randomhashes paths.txt
$ wrk -c 10 -t 10 -d 20s -s multiplepaths.lua http://localhost:8080/
multiplepaths: Found 4000000 paths
multiplepaths: Found 4000000 paths
...
Running 20s test @ http://localhost:8080/
  10 threads and 10 connections
  Thread Stats   Avg      Stdev     Max   +/- Stdev
    Latency    92.86us  282.80us  14.31ms   99.63%
    Req/Sec    11.61k     4.21k   28.80k    60.60%
  3698507 requests in 20.09s, 296.28MB read
  Non-2xx or 3xx responses: 9
Requests/sec: 184077.80
Transfer/sec:     14.75MB
Our benchmark averages a little over 180K requests per second. However, if we calculate the requests per second using our logs as shown below, we see that it is actually around 97000 requests per second. I believe the reason for the increase in speed is that as soon as one the hash functions used by the bloom filter does not match, it stops running any other hash function checks for that given input and returns that the input is not in the bloom filters.
2025-08-31 22:03:12.304 | DEBUG    | __main__:verify_hash:23 - 973
2025-08-31 22:03:12.305 | DEBUG    | __main__:verify_hash:24 - 999027
2025-08-31 22:03:22.719 | DEBUG    | __main__:verify_hash:23 - 2043
2025-08-31 22:03:22.720 | DEBUG    | __main__:verify_hash:24 - 1997957
2025-08-31 22:03:32.825 | DEBUG    | __main__:verify_hash:23 - 3087
2025-08-31 22:03:32.825 | DEBUG    | __main__:verify_hash:24 - 2996913
If we take the number of True hits (which are false positives), we get the following:
(3087 / 3000000) * 100 = 0.1029
So our false positive rate is close to 0.1% as expected.
Ru-running Our Tests on 1.3 Billion Passwords
For the sake of completeness, we’ll re-run the above on the larger password hash file which contains 1.3 billion password hashes. The resulting bloom filter is 2.3 GB in size with a false positive rate of 0.1%. If we use a subset of previously seen SHA1 hashes that were in the hash file, we again get similar performance (around 76K requests per second):
2025-09-01 08:37:21.633 | DEBUG    | __main__:verify_hash:25 - 1000000
2025-09-01 08:37:21.633 | DEBUG    | __main__:verify_hash:26 - 0
2025-09-01 08:37:34.510 | DEBUG    | __main__:verify_hash:25 - 2000000
2025-09-01 08:37:34.510 | DEBUG    | __main__:verify_hash:26 - 0
2025-09-01 08:37:47.826 | DEBUG    | __main__:verify_hash:25 - 3000000
2025-09-01 08:37:47.826 | DEBUG    | __main__:verify_hash:26 - 0
If we then use random SHA1 hashes as input, again, we get similar output and similar performance (around 94K requests per second):
2025-09-01 08:35:41.125 | DEBUG    | __main__:verify_hash:25 - 1043
2025-09-01 08:35:41.125 | DEBUG    | __main__:verify_hash:26 - 998957
2025-09-01 08:35:51.649 | DEBUG    | __main__:verify_hash:25 - 1950
2025-09-01 08:35:51.649 | DEBUG    | __main__:verify_hash:26 - 1998050
2025-09-01 08:36:02.254 | DEBUG    | __main__:verify_hash:25 - 2894
2025-09-01 08:36:02.254 | DEBUG    | __main__:verify_hash:26 - 2997106
The false positive rate is again around 0.1:
(2894 / 3000000) * 100 = 0.096
Conclusion
As seen, bloom filters can be powerful data structure and lightning fast solution to use for specific use cases such as checking to see if a password hash was previously seen in previous data breaches. The next time you run into a solution, ask yourself, is this something a bloom filter would help in solving or speeding up?. Besides using bloom filters directly, some data structure solutions such as Redis also support bloom filters, which allows us to share our bloom filters across multiple instances of a web application.